Hey, everyone. dirt.water.sky has a new digital house:
dirtwatersky.com
Hope to see you there!

Hey, everyone. dirt.water.sky has a new digital house:
Hope to see you there!
Today marks my 32nd year alive! That seems way too high; I could’ve sworn I was just celebrating my 25th birthday . . .
Anywho, the weather in Louisiana has been jerking towards cooling off – rather than a nice gentle slide into colder temperatures, we’ll have one day with a high of 90F, the next with a high of 75F, and then bounce back up to the high 80s. Overall, though, we’re coming down from the peak heat of summer. Hooray!
As the weather cools down, it’s much easier to spend prolonged periods of time outside without feeling like the sun’s melting away my life. I love spending time outside, and I love changing things around the house. So what better way to celebrate my birthday than to tackle a project that’s been in the back of my mind for months!
When I had my new driveway installed last spring, I decided the little strip running between the turfstone and the fence would be cute as a garden. I mulched and sewed seeds and . . . weeds grew.
Truth be told, I didn’t try super hard to grow flowers in the strip garden because I usually park on that side in case I need to pull out my bicycle or garbage bin (on the other side of the driveway is a low garden wall). That means I normally get out of my car and walk on the strip – and I’d be tromping any flowers that did grow!
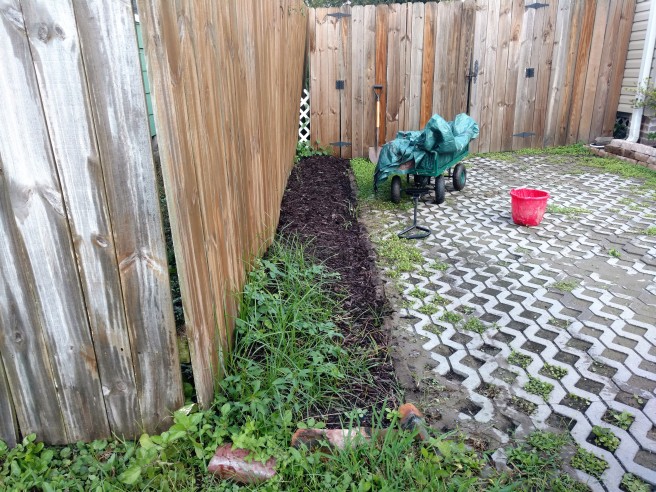
For a while, I realized the best solution for now would be just laying down some pavers.
I already had a good bit of sand hiding beneath some weed cloth (the sand was leftover from over-buying when I installed my garden paths). Therefore, all I had to buy was about $50 worth of pea gravel and 12″ x 12″ pavers. Nothing sexy, except that pure, square function.
Step 1 involved pulling all the weeds and roots that I could and transferring the mulch to a keeping spot in my backyard. I can always use mulch; I just didn’t have any Emergency Mulch Needs right that minute.
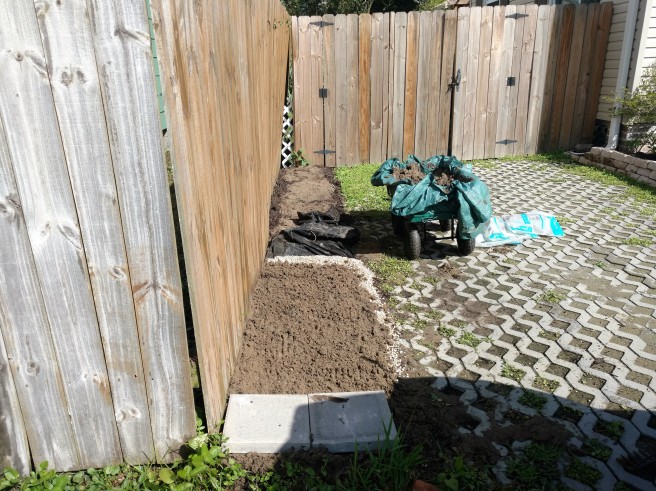
With the mulch out of the way, I pulled up the weed cloth and shoveled the sand into my handy garden cart. This was a fabulous gift from my mom last year. It’s great for toting heavy bags, rocks, etc. around the yard, and if I line it with a tarp, it doubles as a wheelbarrow. The sides fold down for easy dumping.
The next step involved laying the weed cloth back down and leveling out the significantly uneven parts with the pea gravel. Then I shoveled the sand back on top of the cloth and gravel and rake it even.
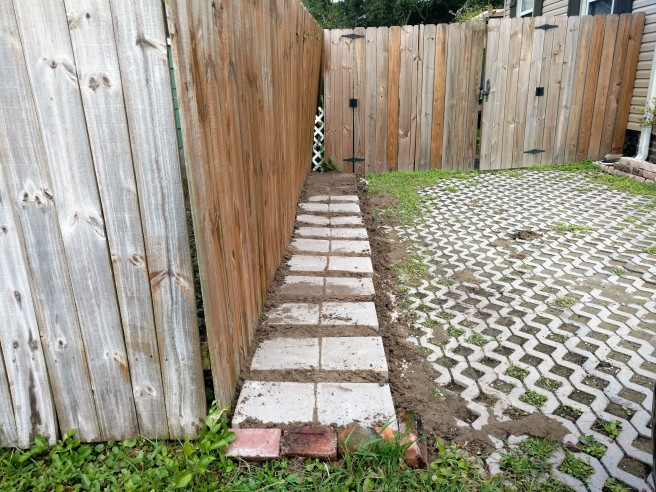
Bing, bang, boom! Pavers.
I spaced them with a little piece of 2×4. I actually ran out at the end – those last four are scavenged from the chicken coop (which is why they blend in with the sand). The rest of the sand filled in the gaps. The above photo still looks a little dirty, but I’m happy with the result. I’ll probably shore up the driveway side with some edging so the next big storm doesn’t wash away the sand.
This project took about two hours, maybe a little less. I tend not to watch the clock closely when I’m in the throes of a project. I tell you what, though. It sure feels good to finish a project that’s been on my mind for months.
Here’s to another year of projects, big and small!

Autumn might seem like an odd time to start thinking about a new garden. Although we aren’t even halfway through October, my friend in Colorado told me they saw their first snow last week.
Even if you’re lucky enough, like me, to live in a subtropical climate where the growing season more or less doesn’t stop, autumn is an excellent time to start planning next year’s garden. Depending on your weather, you might still be able to clear ground and start a brand new plot by making a lasagna garden – basically, layering browns and greens (say, cardboard and grass clippings) that will not only block the weeds, but will compost into rich food for your new baby plants.
But how do you even decide what to grow? Even when limited by the selections of local stores, there are still racks upon racks of little green producers competing for your attention, leaves waving in the breeze and blooming appealingly.
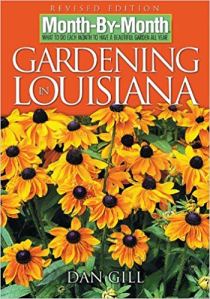
The first time my mom visited my new house, she bought me a great gardening book. It’s called Month-by-Month Gardening in Louisiana and is divided up into types of plants (shrubs, trees, herbs, vegetables, etc.). Basically, within each section, two pages are devoted to each month. You’d be surprised how much information they can pack into those two pages.
This book guides readers beyond just plant selection, including what should be transplanted vs sown as a seed, when certain plants should be trimmed back, and what pests a gardener might expect to see (and how to deal with them).
Month-by-Month is as close as I get to a gardening bible. There are a ton of really excellent gardening books out there, but if you don’t know where to start, I’d recommend finding a book in this series. A quick search shows me editions for most southern states, a few that cover regions, and some that cover multiple states.
Of course, check out your library to see which books they carry!
But aside from books, there are many free resources to help guide your plant planning. One of my favorites is the local agricultural extension service. Almost every state has one through partnerships with universities. My local service is supported by Louisiana Statement University, and they provide publications and guides on their website. I don’t even have to leave the comfort of my couch to learn about gardening in my region!
If you’re someone who’d rather leave the comfort of your couch (which is good, since you’ll need to do that in order to plant your garden anyway…), another free resource is the knowledge in many of your fellow citizens.
Happy gardening! (Or happy garden-planning!)
In the past few years, I’ve blasted through too many pairs of gloves. I use them for a combination of building (holding splintery wood) and gardening (digging, weeding), and I’ve come to really value a good glove. That said, some projects are fine for cheapos.
You can pick up gloves every where from dollar stores to Etsy. Most of mine have come in the form of gifts or last-minute purchases at a home improvement store. I actually hate buying gloves because so many pairs have let me down.
Sometimes gloves can feel like a waste of money, but if you do any kind of work with wood, stone, concrete, dirt, or plants, you really need to protect your hands. Gloves don’t just keep your nails clean; they’ll shield you from splinters, spiders, and other nasties hiding in your project. And if your yard is like mine, they’ll also protect you from a seemingly endless supply of broken glass in the ground (it’s like my yard used to be a dumping ground for old windows. Sheesh!).
Below are the gloves I have in my current rotation, cheapest to most expensive. After that, I’ll go over the things to look for in a good gardening gloves.
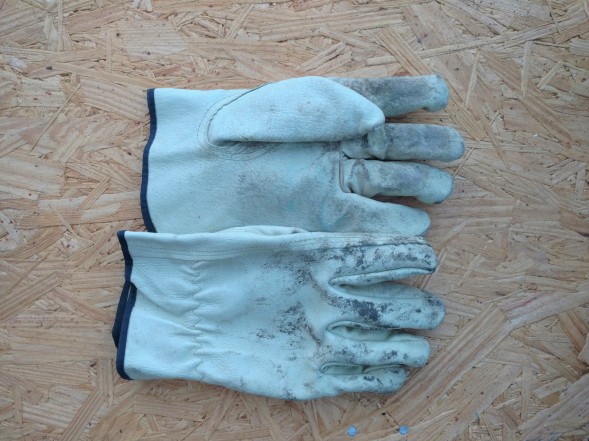
If I’m totally honest, I don’t remember how much I paid for these gloves because don’t remember where I bought them (possibly Big Lots?). They’re thin leather, which is pretty good for durability. However, despite some use, they’re pretty stiff and not at all tailored to my hands. The bulky/stuff fingers make fine work difficult.
They aren’t padded enough to be good for rub prevention (like in using a shovel). I mostly use these for light-duty work where I just need so type of barrier between my hands and the object – carrying a few concrete blocks, dragging downed tree limbs, etc. As these were cheap (or maybe free), they are also my go-to gloves for messy work, like mucking out the chicken coop.
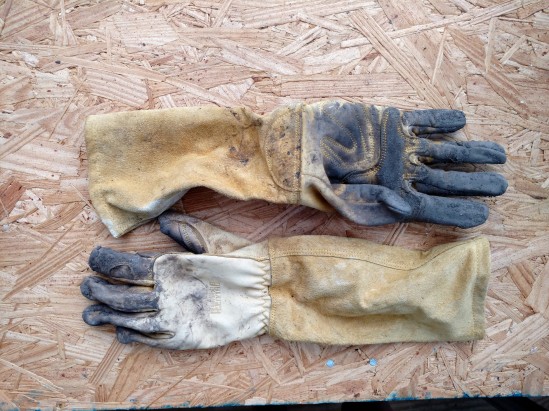
After my last everyday pair of gloves suffered blowouts in the fingertips, I sprung for a slightly more expensive pair at Lowes. You can find them here.
These actually fit me and the fingers have a lot of flex, so I use them for the majority of my work in the garden. The leather on the palms and fingers adds some durability and a little bit of padding, so they’re also what I use when handling tools and rough material that requires dexterity.
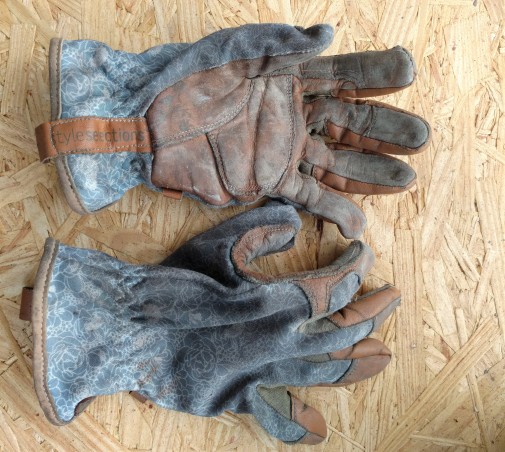
I received these last year for Christmas. They have the totally awesome name of “gauntlet gloves,” so I feel a bit like a knight when wearing them. They’re made of “supple goat leather,” so they were super soft and flexible right out of the bag. These gloves are so nice that I was reluctant to use them for a long time (though you can see I’ve clearly gotten over that).
The main downside to these is they still turn my hands and lower arms kiiiinda orange. Also, I can’t really use these during the summer because that leather just traps the heat in my arms. However, they are really nice for clearing out dense patches of weeds or dealing with bushes – anything that might otherwise scratch up my arms. Truth to told, I wouldn’t have bought these for myself, but I’m glad to have them.
Of course, different tasks have different requirements, but in the list below, I’m thinking about one glove that would suit a multitude of applications.
It’s what all three pairs of my gloves share. I’ve had many, many gloves, and I don’t toss things until they’re destroyed. My canvas gloves and nitrile-dipped gloves have all experienced blowouts in the fingers. Leather is the reason the gloves in my list above have stuck around. At a minimum, you’ll want your palms, fingers, and fingertips covered. I haven’t tested any faux leather gloves, so I’m not sure how those hold up.
My all-leather gloves tend to make my hands sweaty. Although leather breathes, it doesn’t do so as well as other materials. That’s why I like the cotton backs of my workhorse gloves. One downside of those, though, is the thinner material is a weak point and also an area where wetness can get into the glove. Breath-ability in a glove is important not just for comfort, but also to prevent bacteria growth and to keep your hand from slipping around.
Again, fit is where having those partially cotton gloves comes in handy. I find that it’s more difficult to get a close fit on all-leather gloves because the material is thicker. However, a more expensive pair of all-leather gloves made of more supple leather might be able to achieve the same result. Also look for some elastic or a strap around the wrist area so the gloves don’t fly off when you’re shooing chickens out of the garden.
If this is a glove you’re using for both building and gardening, you’ll want at least a little bit of padding to prevent blisters. At a minimum, look for padding along the base of your fingers and thumb. If you don’t need much, a double-layer of leather might do the job. If you’re planning on using these gloves for a lot of digging, tilling, etc., look for ones designed specifically with padded areas.
(for my own regular use, anyway)
Canvas is attractive because it’s inexpensive, free of animal products, and seems sturdy. However, I’ve quickly ripped through almost any canvas glove I’ve ever bought. They get wet and slightly used, and suddenly they’re tearing like tissue paper.
Since the fingertips can be a weak point anyway, I want something super tough covering my fingers. That usually means they’ll be unwieldy to use in screen navigation. Besides, if I’m covered in dirt, I don’t really want to pull out my phone anyway. Touchscreen fingertip pads, in my opinion, are an unnecessary feature of a gardening glove.
Nitrile-dipped gloves grabbed my attention at first because, like canvas, they’re on the cheaper side and seem durable. However, I’ve found that they just don’t hold up for long. After a season coated in garden mud, my fingers poked through the nitrile. They also don’t hold up around sharp objects – nails, etc. – in construction. These are probably find for folks doing light gardening, but I need something tougher for a multi-use glove.
A bad glove is at the very least a hassle and may give you blisters. However, choosing a poor glove may also result in more serious injury if the material isn’t enough to protect your hands from shards, splinters, and other hazards present in your yard or workspace.
I’ve found that good gloves start at around $20. As of this posting, my Mid-Grade Workhorse pair run $21.98. I’ve been using them all year and they’ll probably carry me through the winter, depending on what projects are in my future. For my next pair, I plan to shop around and spend up to $40. Hopefully I can find a pair locally!
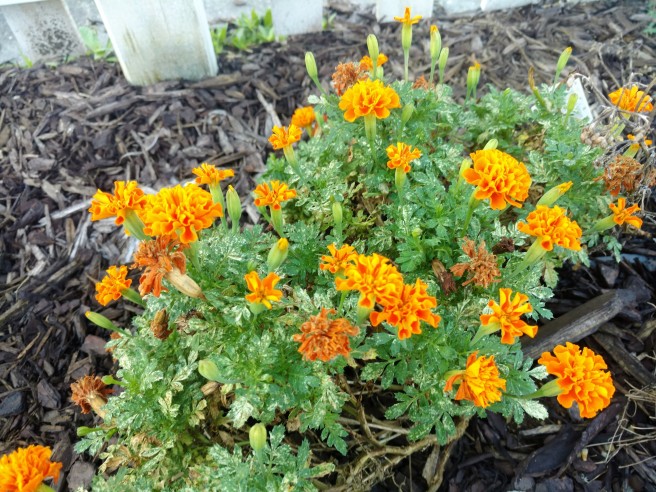
Ah, the humble marigold. With barely a thought, I always seem to pick up some marigolds whenever I’m starting a new garden.
These sweet flowers are basic yet hardy and cheerful. They’re one of the staples of my front yard garden, where I’ve focused on pink, yellow, and orange. I rely on gaura for the much of the pink in my yard, and the marigolds really pack the orange punch.
As a reminder, I live in zone 9b, so your experiences may differ from mine.
Marigolds are hardy in zones 2-11. Holy cow, that’s a huge spread! They also tolerate almost any kind of soil and bloom from spring through autumn.
Mums are sometimes considered the fall flower, but in warmer climates like mine, it can be difficult to keep mums alive through October. The marigold is an excellent substitute that provides the rich orange blooms many of long for when autumn arrives.
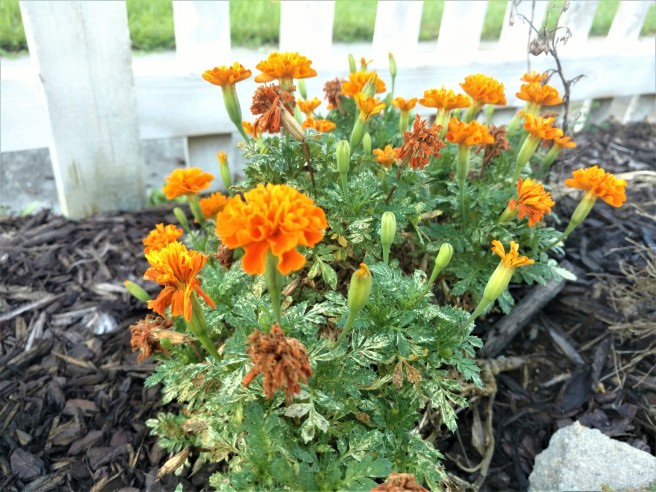
The main three species of marigold are African, French, and signet. The ones I’ve seen most often in stores near me are the French variety, which range from 6 inches to 2 feet tall.
I have to admit, one of the main reasons I have so many marigolds in my front yard (a few dozen) is my local home improvement store had a ton of them on the clearance racks – $1 or less for 6 plants. Much of my front yard garden was built from those clearance racks, actually, and I filled in the rest with seeds and a few bulbs. A beautiful garden doesn’t have to be an expensive one!
One thing to keep in mind, though, is clearance plants tend to look a little rough. The marigolds I picked up sometimes only had 5 out of the pack of 6 plants still alive. But under the right conditions (in my yard, that means blazing subtropical sun and twice-a-day watering in the summer via soaker hose), they’ll become lush little bushes of color.
Highlights:
When I was a kid, I’d turning out the light and climbing under the covers at nine o’clock. After a few minutes, the hall outside my door would grow quiet as my parents retreated to the living room to watch TV. Then, I’d reach under my bed, pull out a flashlight, and open the top book of the stack that lived at my bedside. During those years, I probably read more than I slept every night.
Fast-forward a couple of decades to when I was deciding what to pursue in graduate school. There really wasn’t that much debate. I could get a master’s degree that involved reading books and talking and writing about them for several years? Um, yes, please.
There are two things that happen when you’ve fallen into a really excellent tale:
Both are ways of removing focus from yourself, which can be healthy in a world of selfies and constant comparisons to the lives of others through social media. Gardening and spending time in nature offer this same sort of therapy.
So I’m especially delighted when writer’s take the time to slow down, study, and capture the natural world around us in words. Here are a few that have stuck with me over the years:
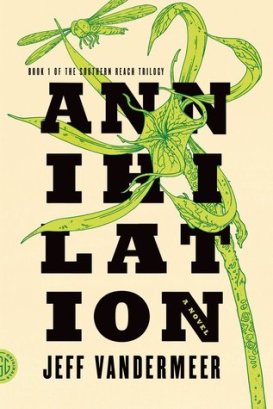 While the oddness of the story is what initially appealed to me, I didn’t expect to come away identifying so strongly with the main character, a biologist. For a few weeks, I had all but decided to go back to school to earn a BS in biology* – until I came to my senses and remembered how I’ve always struggled with the sciences. This was the passage that initially ensnared me:
“My lodestone, the place I always thought of when people asked me why I became a biologist, was the overgrown swimming pool in the backyard of the rented house where I grew up . . . Soon after we moved in, the grass around its edges grew long. Sedge weeds and other towering plants became prevalent . . . The water level slowly rose, fed by the rain, and the surface became more and more brackish with algae . . . Bullfrogs moved in . . . Rather than get rid of my thirty-gallon freshwater aquarium, as my parents wanted, I dumped fish into the pool . . . Local birds, like herons and egrets, began to appear . . . By some miracle, too, small turtles began to live in the pool, although I had no idea how they had gotten there.”
The biologist goes on to describe how she’d “escape” from her bullies and parents to this developing ecosystem. She observed its changes and took notes on species and life cycles. Rather than learn about ecosystems through textbooks, “[she] wanted to discover the information on [her] own first.”
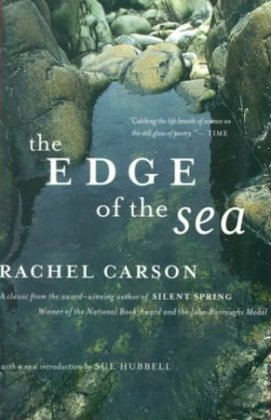 “The Marginal World” by Rachel Carson
Rachel Carson was a marine biologist best known for Silent Spring, a book concerned with the impact of pesticides on the environment. However, I first read her in a class on the craft of nonfiction, while we were studying nature writing. “The Marginal World,” first published in The Edge of the Sea, describes a trip to the shore in detail that shimmers with the ethereal.
“Under water that was clear as glass the pool was carpeted with green sponge. Grey patches of sea squirts glistened on the ceiling and colonies of soft coral were a pale apricot color. In the moment when I looked into the cave a little elfin starfish hung down, suspended by the merest thread, perhaps by only a single tube foot. It reached down to touch its own reflection, so perfectly delineated that there might have been, not one starfish, but two. The beauty of the reflected images and of the limpid pool itself was the poignant beauty of things that are ephemeral, existing only until the sea should return to fill the little cave.”
“John Steinbeck” is a name reviled by many high school students forced to slog through The Grapes of Wrath. I count myself lucky that I didn’t read that heavy volume until graduate school, where I could appreciate Steinbeck’s lengthy descriptions of rural America. Few things make me feel more rooted and patriotic than Steinbeck’s vivid accounts of American countryside, from Oklahoma to California. However, it is East of Eden that Steinbeck described as “the story of my country and the story of me.”
“From both sides of the valley little streams slipped out of the hill canyons and fell into the bed of the Salinas River. In the winter of wet years the streams ran full-freshet, and they swelled the river until sometimes it raged and boiled, bank full, and then it was a destroyer. The river tore the edges of the farm lands and washed whole acres down; it toppled barns and houses into itself, to go floating and bobbing away. It trapped cows and pigs and sheep and drowned them in its muddy brown water and carried them to the sea. Then when the late spring came, the river drew in from its edges and the sand banks appeared. And in the summer the river didn’t run at all above ground. Some pools would be left in the deep swirl places under a high bank. The tules and grasses grew back, and willows straightened up with the flood debris in their upper branches. The Salinas was only a part-time river. ”
I’m sure I’ve forgotten other fantastic works, but these are the words that I carry with me day-to-day, sometimes ringing in my ears loudly, sometimes faint and soft. Looking back over just these three texts, though, it’s pretty clear that I feel a connection to water. But what is nature without water? Water – and words – are necessary for life.
*This isn’t as crazy a proposition as it might initially seem. I get discounted tuition at the university where I work, and I have several semesters of my G.I. Bill left to use. And I’m a total nerd who loves to learn.
Every now and then, photos of videos of raccoons will appear on my Facebook Newsfeed, talking about how cute or impressive the little buggers are. I have to admit, I used to agree. Raccoons can be little chubby balls of fur with masks and human-like grabby paws.

But ever since I got my first pair of chickens back in 2013? Ugh. Rarely have I felt such malevolence toward another living thing.
Recently, Toronto spent millions of dollars on “raccoon-resistant” trash bins, only to have some “uber-smart” raccoons still break into the garbage like it ain’t no thang. I wasn’t surprised. While memes might paint raccoons as chubby, lazy little critters, anyone who’s experienced them as a pest will tell you the opposite is true (okay, they’re probably still chubby, but they sure as heck aren’t lazy).
And they’re everywhere.
I live in the middle of a residential area, where lots are about 60 feet wide. Although houses are raised (thanks, sea-level elevation and flood potential!), the openings are fenced or bricked up. And yet, there are hoards of raccoons that are able to find someplace to sleep during the day so they can wreak havoc at night.
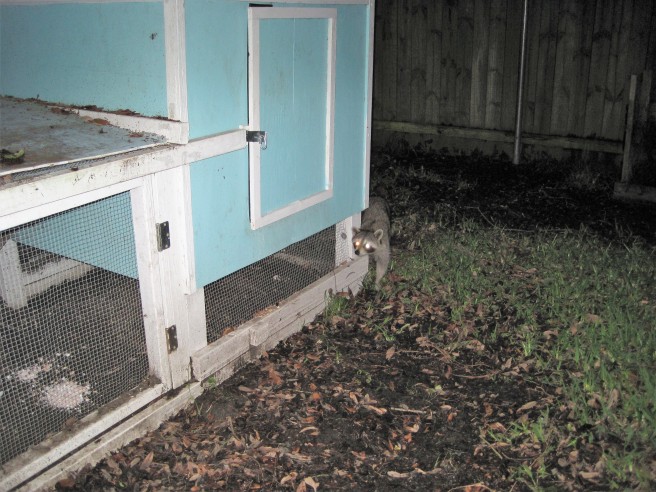
One night, my chickens started making concerned coos. I went outside with my hefty Maglite to scare off what I assumed was a single raccoon, or maybe a pair. When I round the corner, four pairs of eyes gleamed back at me from on and around the coop. There was a rustle overhead, and I shined the flashlight into the branches of the oak tree to find several more raccoons staring down at me. In total, there were more than half a dozen.
I inched closer to the raccoon gang, made noise, and threw sticks. None of them moved. Whenever animals don’t behave as expected, rabies is a concern. However, I’m more of the opinion that this particular gang was used to people and empowered by their numbers. Whatever the reason, I decided to put faith in the strength of my coop and go back inside. Fortunately, they eventually left without breaking in.
Other memorable raccoon run-ins include:
Unless you physically relocate the animal beyond its reasonable travel distance, or you make whatever “treat” completely inaccessible, raccoons will keep coming back. They are persistent, surprisingly clever, and occasionally malicious.
A friend recommended I get an airsoft gun and pop the critters. I’m preeeetty sure that’s not legal within city limits, but even if it is, I have terrible aim and would probably hit a hen…or a neighbor!
Therefore, for current and would-be chicken owners, I have one major piece of advice:
When installing your coop and run:
Remember that you can always rebuild. I learned about 40% of what I know about coops and predators from research and 60% from failures and near-misses. The important thing is that you pay attention, learn from what went wrong, and immediately take action to remedy the misstep.
Although I prefer prevention as a way to eliminate painful situations before they arise, it’s not like I can eliminate raccoons from my neighborhood. Sometimes, all you can do is make yourself a more troublesome than everyone around you.
We’re in October, you guys! This is my favorite month for a number of reasons. Halloween means costumes, my birthday means cake (I’m a funfetti gal, through and through), and autumn really kicks into gear!
October’s a time of change. Holiday decor starts to make an appearance. Leaves begin to change. Here in New Orleans, the weather finally cools off enough that festival season roars to life.
That said, our high temperatures are still in the 80s (Fahrenheit), so the weather doesn’t exactly feel like the North Carolina autumns with which I grew up.
If I lived further north, I probably would’ve planted my fall garden a few weeks ago. However, one of the lovely aspects of living in a subtropical climate is our winters are very mild. We might see one or two days with a hard freeze, but those typically aren’t until around February. This weather means that I can plant a bit later because the winter growing season is either long or doesn’t end at all.
Well, one plant is already in the ground and has been all summer. My monster eggplant is huge and still producing, so it’ll stay in place until it starts to die back. This is the first time I’ve had such success with eggplant; I’ve planted it once or twice before, but they typically fail before reaching waist height.
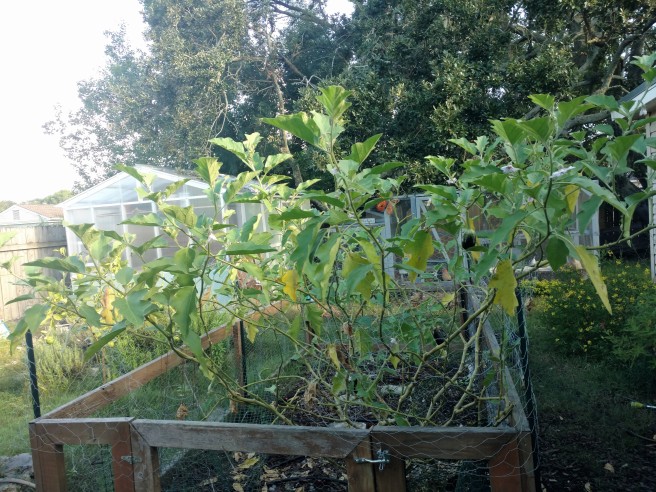
The eggplant currently stretches across the entry gate and beyond the boundaries of the garden. I cut it back a little bit so that I could put two-foot-tall poultry fencing at the top of the wooden fence (my younger chickens kept hopping in the garden and scratching around). Eggplants tend to max out at four feet tall. I’m five feet and change, and this beast is taller than me.
Anyway, enough with the monster eggplant. (can you tell I’m proud?)
As I’ve grown more confident with growing, I’ve experimented more with growing from seed. Doing this has a few benefits:
Of course, many root vegetables like carrots need to be planted from seed anyway. Transplanting them, even as seedlings, can permanently damage the root.
As to the middle point in the list above, I’m not going too terribly crazy this year. This is the first time I’m doing everything from seed, so I’m sticking to more common standards.

Days to maturity (from seed): 110-115
Size at maturity: 4-6 inch diameter; up to 1 lb in weight
I’ve grown over types of onions before – usually as transplants or seedlings. This will be my first try at growing them from seed!

Days to maturity: 70-80 days, some varieties up to 120 days
Size at maturity: typically 6-8 inches long, but it can vary
Carrots are one of my go-to winter veggies because they’re easy and dependable. My one mistake is leaving them in the ground too long and allowing them to rot. The mix I’m planting this year includes “Atomic Red, Bambino Orange, Cosmic Purple, Lunar White, and Solar Yellow.”
Days to maturity: 45-70
Size at maturity: varies
This mix includes Lolla Rossa, Rouge D’Hiver, Salad Bowl, Red Salad Bowl, and Italienisher.
Days to maturity: 70-80
Size at maturity: head is 6-8 inches across, weighs 3-5 lbs
I’ve tried to grow cauliflower from a transplant before, but I wasn’t successful due to pests. I’ll have to keep an eye out this year!

Days to maturity: 60-90 days
Size at maturity: head is 5-8 inches across
This is an “heirloom favorite.” Although I didn’t intentionally select heirloom varieties of plants, the idea of heading in that direction appeals to me. Growing heirloom varieties of plants has a romantic connection to the past – but I’ll only keep trying them if they produce.
I don’t plan to plant any new herbs, but the ones I started in the spring and summer are still going strong. At the base of the eggplant, I have chives. In pots, I also grow rosemary, basil, thyme, and parsley. (I was going for the ol’ “parsley, sage, rosemary, and thyme” combo, but I’ve never had success with sage in Louisiana.)
Basil usually dies back in the winter, but the others should keep on trucking, so long as we don’t get a hard freeze.
To be honest, one of the reasons I look forward to autumn and winter is to get a break from the voracious growth of summer. All my gardens in the front and back yard are a lot to tend for one person. Between the daily bright sun and the “wet season” with regular afternoon rain, the weeds tend to go wild.
I’m ready for things to quiet down a bit.
Since the last post was on tightening up my finances, let’s continue down that path and explore how to keep that wallet fat with a building hobby.
It should be noted that “building hobby” refers to personal projects – cabinets, potting benches, weird little tables, etc. Do not skimp on materials for projects where doing so would risk safety or where the materials need to withstand significant weight or weather conditions. You don’t want to use old, termite-chewed posts for the new pergola beside your house because when that thing falls, it’ll take out your gutters and a chunk of roof.
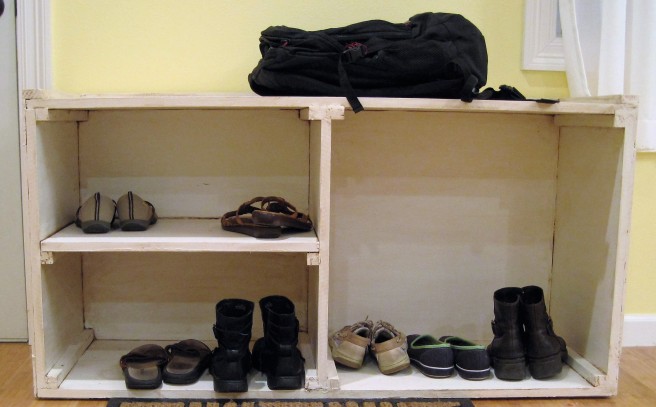
The plan is the step where you have the most control over your project’s expenses. Say you want to make a basic storage bench to keep by your front door for shoes. You have some scrap wood, but some of the lengths are a bit short. Also, some of the pieces are stained or blemished.
Rather than set your heart on a polished wood throne of a bench, maybe your storage bench will be low to the ground with small cubbies. Cover it with some old paint and add height on top of the bench with some cushions from a thrift store.
I look for inspiration on pinterest, as well as higher end stores like Crate and Barrel and Pottery Barn. Once I have some ideas in mind, I’ll search for build plans that others have made, such as those over at Ana White. While I’ll ultimately draw my own plans, it’s good to check over the plans of others to make sure I’m not forgetting a step.
Like the cushions in the bench example above, second-hand supplies are a great way to drastically cut down on expenses for the stuff you do actually have to buy. This isn’t exactly a new concept, and most frugalistas will tell you to a) determine whether or not you really need the thing, and b) if you do need the thing, buy it used. Getting supplies second-hand, whether you find stuff on the curb (make sure it’s marked for take-away!) or buy from a re-store, also saves the environment some grief.
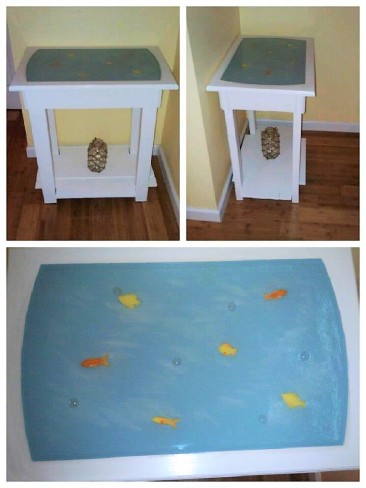
Check around for stores that sell reclaimed building supplies. One of my favorite places in New Orleans is The Green Project. I build this entry table with a cabinet door and wood I found there:
While The Green Project is a place local to my area, there are several options where you might find free or cheap building supplies:
In terms of paint, you can usually find discounted buckets by the paint desk at Lowes or Home Depot. That probably won’t be the cheapest option; however, it might be better quality than something that’s been sitting in someone’s garage for who knows how long. If your project involves wood that needs to stand up to prolonged exposure, old or poor quality paint might lead to cracking and rot.
This option is more feasible if you’re years into building stuff and don’t have anyone around to complain when you start tearing apart bookcases.
My master bedroom has an old little alcove. One year, I decided to turn it into a reading nook, complete with a padded storage bench and bookcase. However, it was dark and tight. I ended up just reading on my bed most of the time.
Eventually, I needed to build a hide-away cabinet for a massive new litter box that now resides in the living room. Out comes the reading nook. Supports for a bench became supports for what my friend called “The Shit Shack.” Plywood and fiber board transferred over too, and the only thing I had to buy for the project was a bit of contact paper that looked like marble to class up the inside (oh – and to make cleaning easier). A new kitty W.C. for less than the cost of a bag of litter!
Many of the places where you can find reclaimed building supplies also have secondhand power tools. Be careful, though, as these are often sold “as-is” and might not be returnable if they don’t work. I got lucky and inherited my first tools from my granny. Over the years, my parents have also gifted me with more tools for Christmas and my birthday.
If you have time to wait, try to purchase your tools around Father’s Day, when home improvement stores have sales.
If buying isn’t option, your area might have a tool “lending library.” These are community, co-op-type spaces where you can find low- or no-cost tools to borrow. Many also hold free or inexpensive workshops or offer volunteer opportunities where you can learn or hone your skills.
An even cheaper option? Make friends with your neighbors and borrow their tools. Return them cleaned and in excellent condition, ideally accompanied by a six-pack or a tray of cookies.
Normally, I’d say I’m somewhat thrifty. I regularly check on my bank accounts. I make myself wait on major purchases. If I need something, I research deals and coupons, or I wait for sales.
But this year? I’ve spent a little more wildly than normal this year.
All of these projects together total more than the average American family spends on food (groceries and eating out) and entertainment in a year.

That sounds outrageous. It feels outrageous. But I planned for these projects, and they were all paid for in cash. And, ya know, I love coming home and being greeted by a big, beautiful garden – sprigs of gaura waving in breeze, pink and orange zinnias blooming in clusters of little petals, butterflies skipping around on cosmos. Seeing a lawn that was overgrown 95% of the time (because when you mow in Louisiana, it stays neat for about two hours) depressed the heck out of me.
But some things are changing. I’ve spent the past several years renting out part of my house on AirBnB. I’ve met people from all over the world and, overall, hosting has been an excellent experience. My occupancy rate is around 85%, and while it’s deeply satisfying to provide a safe and comfortable place for visitors to our quirky, creative city…
Y’all, I’m tired.
Low-level stress underlies my every day. Will someone accidentally letting the cats outside? Will the next guest is going to rate me poorly because they expect me to play board games with them every night, even though they won’t say anything to my face about it*? And though I find cleaning satisfying, scrubbing the toilet can be a total skeezefest.
That combined with the stress of my regular job means that some days, I teeter on the edge of a meltdown.
Renting out my rooms brings in extra money – usually at least $1000 per month. Those of you who can do math and followed the link at the beginning of this post will realize that amount easily covers even the most expensive of project-years. In non-project-years, that extra dough means I can get away with just sorta watching my finances but not counting every penny. That makes me sound like a slacker, but I do regularly budget.
My favorite tool for tracking expenses is Microsoft Excel, and I’ve tailored it over the years to suit my needs.
Everyone should have some way of tracking his or her money. There are programs and websites to help with this – You Need a Budget, Mint, and the Personal Finance subreddit are solid places to start.
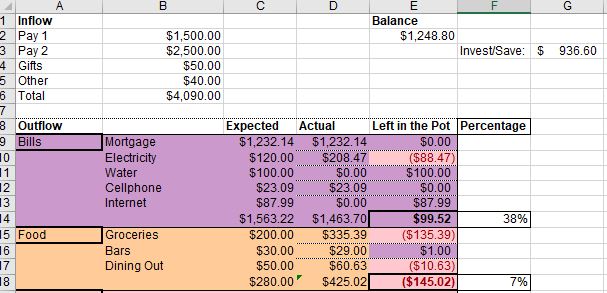
In the image above, you can see how I track sources of income at the top (“Inflow“). Then I split my expenses (“Outflow“) into broad categories that are divvied up into more narrow areas. Based on studying my spending habits, I’ve estimated my expected expenses. Those are compared with what I’ve actually spent to then determine what’s “Left in the Pot.”
At the very bottom of the spreadsheet, each of the Outflow columns are totaled, and this is used to calculate the Balance at the top of the sheet (Total Inflow minus Actual Total Outflow).
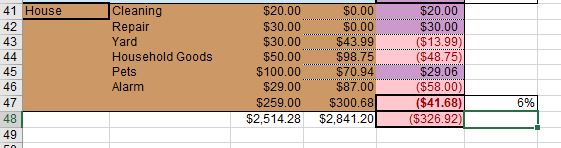
The final column (“Percentage“) shows my Expected Outflow as a percentage of my Total Inflow. In other words, if I want my hobbies to be 5% of my total planned income, I can adjust the Expected budget for that category until I reach 5%.
If you search, “How to budget,” many of the top results describe 50-20-30 rule. These guidelines put 50% of your income to living essentials (mortgage, transportation, food, etc.), 20% to financial goals (savings, debt repayment, etc.), and 30% for things you want but don’t need (travel, toys).
I sort of follow the 50-20-30 rule. On my “essential living” costs like mortgage and utilities (the category I’ve named “Bills”), I aim for less than 40% – preferably closer to 35%. Electricity and water are how I can control the percentage here because my usage impacts the cost. Unlike 50-20-30, my transportation costs are not included here, because that’s a highly flexible category for me (I live in an area where it’s possible to bike to work).
Once I set my “essential living” category, I consider how much I want to save or invest that month. Rather than basing this off my Total Inflow, I have it set as a percentage of the Balance predicted to be leftover at the end of the month’s expenses. The primary reason I’ve done this is because I’m trying to shrink my budget right now, but I still want to save. I’m in the process of adjusting my Expected Outflow numbers to be as conservative as possible, while remaining realistic. Failing to meet the high bar set for savings because you were too harsh when predicting your food budget can be pretty discouraging.
After a month or so with my newly-tightened budget, I’ll reassess how I figure out my savings/investment goal. All that said, though, right now I’m at about 25% of my Total 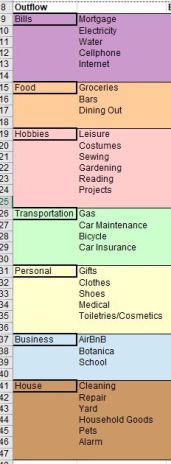 Inflow.
The rest of the categories have greater flexibility and “lower” priority. It feels weird to say food is a “low” priority, but I still have quite a bit of wiggle room there. Right now, it’s less of a concern to me than building my savings. On that note…
At the bare minimum, aim for 6 months’ worth of your expenses (Expected Outflow). A more comfortable amount for me is 12 months because I’ll occasionally use a few “months” to pay for larger projects. If I do this when my account is at the 12-month mark, I can still maintain a safe emergency cushion. In other words, what I consider my savings account is half emergency fund and half rotating major expense fund.
 Each month of my budget is actually a pair of worksheets in Excel. “A” is what you’ve seen so far – categories, totals, and comparisons. “B” is where we get down to business.
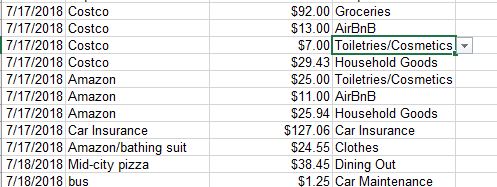
I track the date, where I spent the money, the amount, and the type of expense. At places like Costco where I buy a broad variety of things, I’ll split the receipt across the relevant categories. In the image above, the selected box also has an arrow because it contains a list directed linked to the narrow categories on the “A” sheet. In other words, if I need to switch around my categories titles, it’s just as simple as rewording whatever is on “A.”
Use it as it’s made or tailor this budget to suit your financial lifestyle. The downside of using something like this is you have to regularly devote time to entering every expense (as opposed to many of the professional products that automatically connect with your accounts). However, this one’s free, it’s easily tweaked, and I feel a bit more comfortable without having my accounts connected to another entity.
Download the Example Budget Spreadsheet here.
As I mentioned in the beginning, this was an extremely busy year for big projects. Moving forward, my projects will either be small-scale – i.e. laying a few basic 12″x12″ pavers – or they’ll be made from recycled resources. Fortunately, I have quit a bit of scrap wood leftover from the shed and fence.
In terms of gardening, I have a pretty good handle on growing most of the plants I favor from seed, which can be a tiny fraction of the price of a mature plant. The subtropical climate where I live also encourages lush growth, so long as there’s enough water. As to the latter point, I have a pretty good irrigation system in place in both my front and back yards.
I’m in a privileged position to cut back while maintaining a satisfying lifestyle. Necessary infrastructure, like the aforementioned irrigation systems, is already paid for and in place. My savings account isn’t quite where I’d like it to be, but it’s still plenty to take me through an emergency. I receive regular paychecks and have access to good healthcare. Being in a position where stopping (temporarily or permanently) a secondary source of income is possible? That’s a luxury, and I’m thankful for the choice.
*Story time: a couple spent a week with me. We chatted a bit when we crossed paths in the kitchen or living room, same as I’ve done with guests for years. The couple was always smiling and seemed happy. A few days after their departure, they left a scathing review, stating that they’d felt totally unwelcome and had wished to place board games and have much longer conversations. After 100+ 5-star reviews, I was shocked and took the poor review very personally for a while.
There are a huge range of accommodations on AirBnB, ranging from hotel-like experiences to basically couch-surfing and communal living. If you’re looking for a host who will be a huge social part of your visit – someone to eat dinner or watch movies with – that will be advertised on the listing or it should be clarified through messages before your stay.
