Today marks my 32nd year alive! That seems way too high; I could’ve sworn I was just celebrating my 25th birthday . . .
Anywho, the weather in Louisiana has been jerking towards cooling off – rather than a nice gentle slide into colder temperatures, we’ll have one day with a high of 90F, the next with a high of 75F, and then bounce back up to the high 80s. Overall, though, we’re coming down from the peak heat of summer. Hooray!
As the weather cools down, it’s much easier to spend prolonged periods of time outside without feeling like the sun’s melting away my life. I love spending time outside, and I love changing things around the house. So what better way to celebrate my birthday than to tackle a project that’s been in the back of my mind for months!
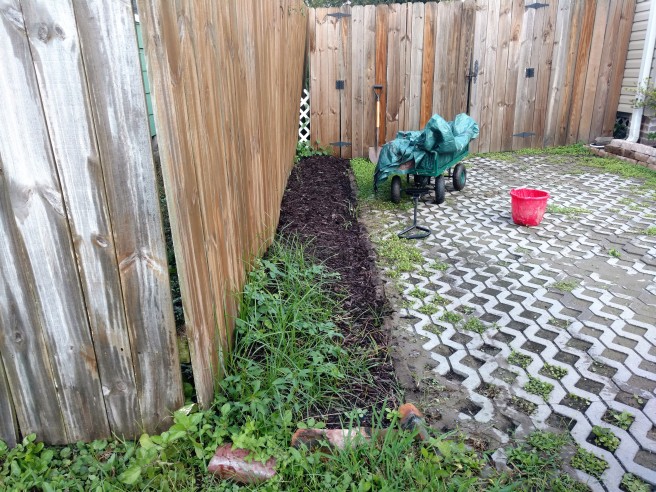
When I had my new driveway installed last spring, I decided the little strip running between the turfstone and the fence would be cute as a garden. I mulched and sewed seeds and . . . weeds grew.
Truth be told, I didn’t try super hard to grow flowers in the strip garden because I usually park on that side in case I need to pull out my bicycle or garbage bin (on the other side of the driveway is a low garden wall). That means I normally get out of my car and walk on the strip – and I’d be tromping any flowers that did grow!
Mmm those lovely weeds and grasses.
For a while, I realized the best solution for now would be just laying down some pavers.
I already had a good bit of sand hiding beneath some weed cloth (the sand was leftover from over-buying when I installed my garden paths). Therefore, all I had to buy was about $50 worth of pea gravel and 12″ x 12″ pavers. Nothing sexy, except that pure, square function.
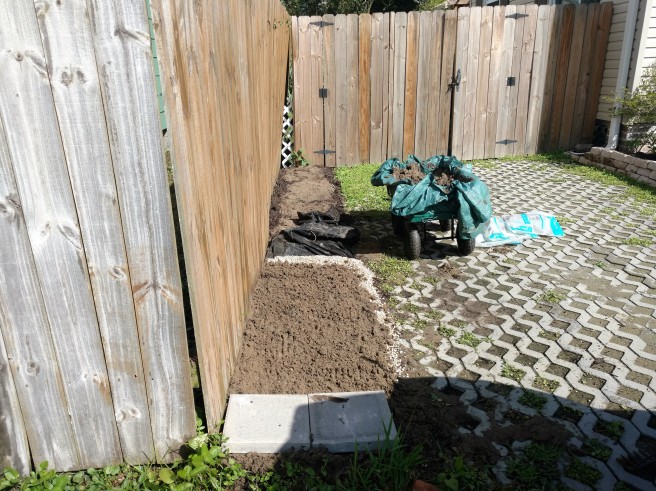
Step 1 involved pulling all the weeds and roots that I could and transferring the mulch to a keeping spot in my backyard. I can always use mulch; I just didn’t have any Emergency Mulch Needs right that minute.
With the mulch out of the way, I pulled up the weed cloth and shoveled the sand into my handy garden cart. This was a fabulous gift from my mom last year. It’s great for toting heavy bags, rocks, etc. around the yard, and if I line it with a tarp, it doubles as a wheelbarrow. The sides fold down for easy dumping.
The next step involved laying the weed cloth back down and leveling out the significantly uneven parts with the pea gravel. Then I shoveled the sand back on top of the cloth and gravel and rake it even.
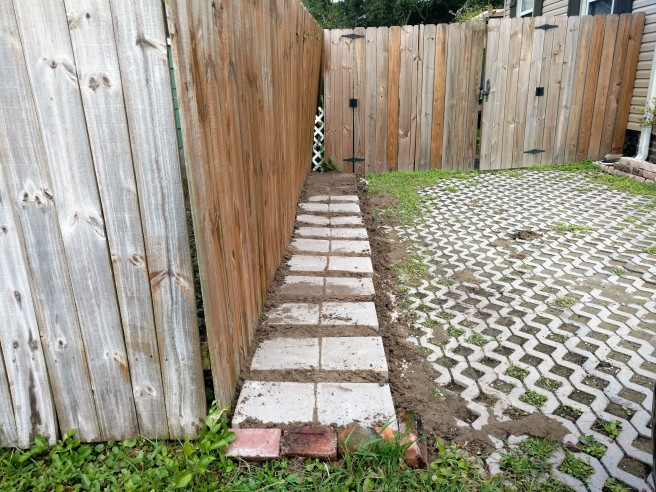
Bing, bang, boom! Pavers.
I spaced them with a little piece of 2×4. I actually ran out at the end – those last four are scavenged from the chicken coop (which is why they blend in with the sand). The rest of the sand filled in the gaps. The above photo still looks a little dirty, but I’m happy with the result. I’ll probably shore up the driveway side with some edging so the next big storm doesn’t wash away the sand.
This project took about two hours, maybe a little less. I tend not to watch the clock closely when I’m in the throes of a project. I tell you what, though. It sure feels good to finish a project that’s been on my mind for months.
Here’s to another year of projects, big and small!
Since the last post was on tightening up my finances, let’s continue down that path and explore how to keep that wallet fat with a building hobby.
Spoiler alert: it might be physically intensive. Photo by Kaboompics .com on Pexels.com
It should be noted that “building hobby” refers to personal projects – cabinets, potting benches, weird little tables, etc. Do not skimp on materials for projects where doing so would risk safety or where the materials need to withstand significant weight or weather conditions. You don’t want to use old, termite-chewed posts for the new pergola beside your house because when that thing falls, it’ll take out your gutters and a chunk of roof.
Projects begin with a plan.
The plan is the step where you have the most control over your project’s expenses. Say you want to make a basic storage bench to keep by your front door for shoes. You have some scrap wood, but some of the lengths are a bit short. Also, some of the pieces are stained or blemished.
Rather than set your heart on a polished wood throne of a bench, maybe your storage bench will be low to the ground with small cubbies. Cover it with some old paint and add height on top of the bench with some cushions from a thrift store.
I look for inspiration on pinterest, as well as higher end stores like Crate and Barrel and Pottery Barn. Once I have some ideas in mind, I’ll search for build plans that others have made, such as those over at Ana White. While I’ll ultimately draw my own plans, it’s good to check over the plans of others to make sure I’m not forgetting a step.
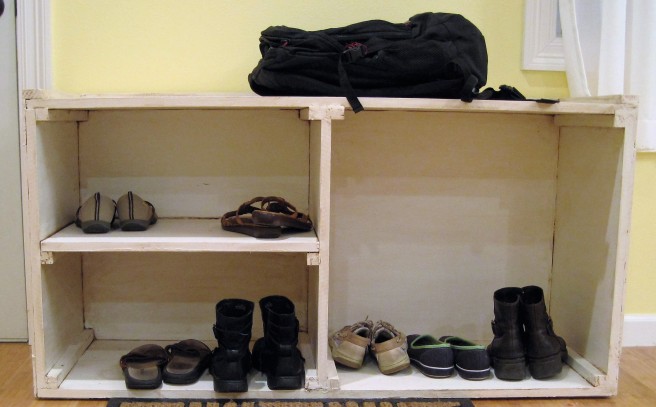
One of the first things I built when I moved into my house was a storage unit for my entryway. Six years later, it’s still as solid as the day I built it.
Get your supplies second-hand.
Like the cushions in the bench example above, second-hand supplies are a great way to drastically cut down on expenses for the stuff you do actually have to buy. This isn’t exactly a new concept, and most frugalistas will tell you to a) determine whether or not you really need the thing, and b) if you do need the thing, buy it used. Getting supplies second-hand, whether you find stuff on the curb (make sure it’s marked for take-away!) or buy from a re-store, also saves the environment some grief.
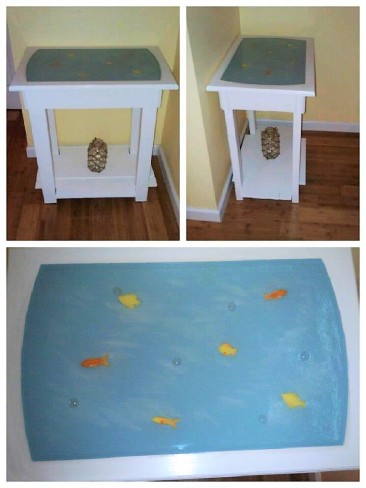
Check around for stores that sell reclaimed building supplies. One of my favorite places in New Orleans is The Green Project. I build this entry table with a cabinet door and wood I found there:
The other materials were paint (of course), modeling clay for the fish, clear floral gems for the “bubbles,” and resin to seal everything in.
While The Green Project is a place local to my area, there are several options where you might find free or cheap building supplies:
In terms of paint, you can usually find discounted buckets by the paint desk at Lowes or Home Depot. That probably won’t be the cheapest option; however, it might be better quality than something that’s been sitting in someone’s garage for who knows how long. If your project involves wood that needs to stand up to prolonged exposure, old or poor quality paint might lead to cracking and rot.
Or recycle an old project.
This option is more feasible if you’re years into building stuff and don’t have anyone around to complain when you start tearing apart bookcases.
My master bedroom has an old little alcove. One year, I decided to turn it into a reading nook, complete with a padded storage bench and bookcase. However, it was dark and tight. I ended up just reading on my bed most of the time.
Eventually, I needed to build a hide-away cabinet for a massive new litter box that now resides in the living room. Out comes the reading nook. Supports for a bench became supports for what my friend called “The Shit Shack.” Plywood and fiber board transferred over too, and the only thing I had to buy for the project was a bit of contact paper that looked like marble to class up the inside (oh – and to make cleaning easier). A new kitty W.C. for less than the cost of a bag of litter!
A note on tools —
Many of the places where you can find reclaimed building supplies also have secondhand power tools. Be careful, though, as these are often sold “as-is” and might not be returnable if they don’t work. I got lucky and inherited my first tools from my granny. Over the years, my parents have also gifted me with more tools for Christmas and my birthday.
If you have time to wait, try to purchase your tools around Father’s Day, when home improvement stores have sales.
If buying isn’t option, your area might have a tool “lending library.” These are community, co-op-type spaces where you can find low- or no-cost tools to borrow. Many also hold free or inexpensive workshops or offer volunteer opportunities where you can learn or hone your skills.
An even cheaper option? Make friends with your neighbors and borrow their tools. Return them cleaned and in excellent condition, ideally accompanied by a six-pack or a tray of cookies.
This trait is both beautiful and terrible. It pushes me to achieve more than I ever thought possible, and yet I almost never feel truly finished with anything – projects, writing, etc. I know that I can always improve.
In Season 1, Episode 7 of “Revisionist History,” Malcolm Gladwell describes two types of artists. Picassos seem to create pieces quickly (but often meditate on the piece long beforehand). Cézannes remake the same song, object, etc. over and over until reaching a “final” product.
Although I think and plan, I am a Cézanne.
I’ve previously traced my chicken coop designs over the six years I’ve lived in my human coop. But long before I ever decided to get chickens, I started thinking about ponds. I’ve always loved the water – gentle splashing, smooth reflections of light. The moment I started looking at houses to buy, in the back of my mind, I was also planning my first pond.
Before I dug into the ground the first time, I had a few goals for my water feature:
a small waterfall
fish
to be able to hear the water through open living room windows.
within reach of an outlet (for the waterfall)
The most obvious location was right outside my side door. There’s a covered exterior outlet, and the side door leads straight into my living room. Perfect!
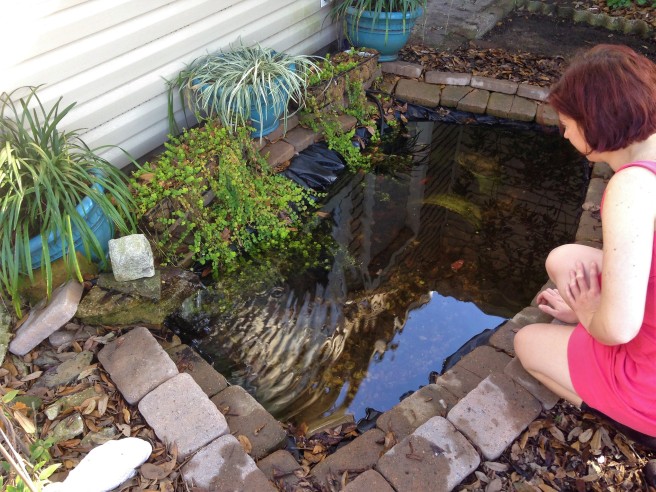
I started digging and pretty quickly ran into a thick PVC pipe. Okay, so my pond would be two levels: the end with the PVC pipe would be about six inches shallower than the far end. I figured it actually worked out pretty well for water circulation because the deeper end held the pump and filter box, and a hose ran the water from the box to the waterfall at the shallow end.
This first pond was basically a hole with a sheet of pond liner on the clay (what passes for dirt here), some river pebbles along the bottom, and pavers around the rim. I built the “waterfall” out of stones and old concrete chunks I found around the yard.
What that picture doesn’t show is the leaves that constantly rained onto the water from an oak tree overhead. The tree provided nice shade that kept algae at bay, but it made cleaning the pond a constant struggle. Those little rectangular pavers were also inching into the water too.
That said, the pond was cute and met my initial needs. It was enough low enough that the chickens stopped by for water breaks. The few goldfish that called it home seemed pretty happy too.
Here it’s not as pristine, but the goldfish enjoyed the creeping jenny trailing into the water. I also added a second layer of pavers around the perimeter, which improved the stability. However, the leaves were still an issue, and the chickens kicked mulch and debris into the pond every time they went near it.
The biggest issue with the first pond? Look how close that wall (and the house foundation) is to the pond. Although the pond likely wasn’t deep enough to permanently impact the foundation, as a new homeowner, I grew nervous (ditto with the weight of the water on that PVC pipe). Having a hole so close to the foundation just wouldn’t do for the long term.
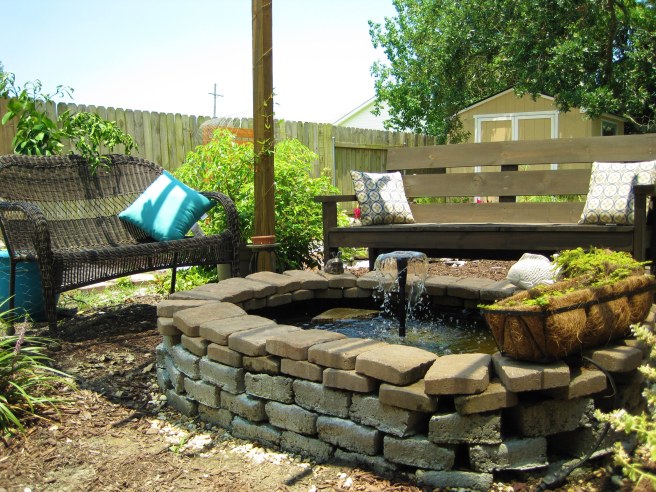
The second pond was a little bit away from the house, but still within reach of the outlet. The distance was maybe eight feet? I also wanted an above-ground pond to combat the mulch-kicking from the chickens.
Rather than buy a bunch of pavers, I decided to build a wooden frame and make my own “pavers” out of Quikrete. They weren’t gorgeous, but they were cheap and functional. As there was no obvious place for a waterfall, I opted for a fountain in the middle.
Actually, what I really wanted was to a hand holding a sword coming out of the water – a la Excalibur and the Lady of the Lake – with the sword acting as the fountain. I tried to build one out of a plastic sword and a manicurist practice hand, but I just couldn’t get it to work. Years later, I’m still sad; the Sword-in-the-Lake fountain would’ve been awesome.
You may notice that this pond had the added benefit of being a nice gathering point for a sitting area. That wooden post between the benches is part of a pergola I built not long after rebuilding the pond. The only thing is, this space was cramped. The pond was also a bit too small because I opted not to dig down more than a few inches before building up the sides.
But the biggest issue with this second version? My own desires and aesthetics. I yearned for mountain streams and curving water. The above-ground pond looked too constructed. I wanted something more natural and meandering, like the creeks of the North Carolina mountains where I used to hike. So down came Pond 2.0.
For the third pond, I started digging again. I laid out ropes and hold water hoses to approximate a winding creek. It would have a waterfall at one end and a pool (with the pump box) at the other. A second waterfall would separate the “creek” and the pool.
Fortunately, I was able to reuse all the pavers – bought and made – and the pebbles. I had to buy a few more bags of pebbles, though, because this new pond was quite a bit larger than previous versions.
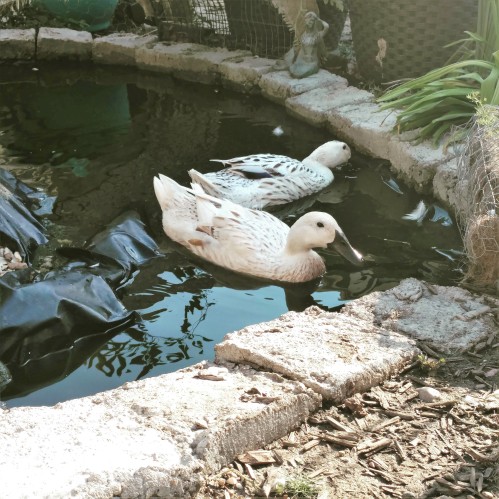
Around the same time I was building this version of the pond, I had four ducklings quickly growing to adult size. One of the reasons I wanted to build larger was to give them a space (in addition to the repurposed bathtub in the coop) in which to splash around. Water isn’t required for ducks, but they sure do love it.
The only downside of having a duck pond is those silly birds are also ravenous murder birds. I can’t really keep fish or any other living thing in the pond. Even the cleverest goldfish with plenty of hiding spots has eventually gotten snapped up.
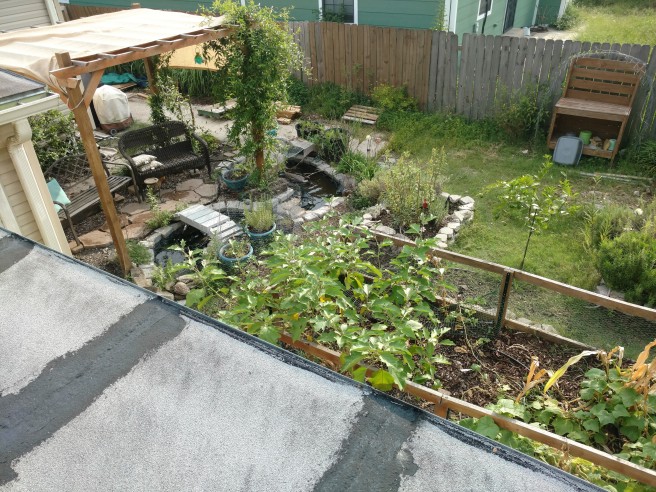
This past summer, though, I tried an experiment and fenced off the upper pond with poultry wire. I added some aquatic plants and let the algae grow, hoping to create the perfect environment for toads and/or frogs. My end goal is to establish a toad or frog community for pest control in the gardens (which are only a few feet away from the pond).
It seemed to take forever – but I also didn’t have a good idea on when tadpoles appear in New Orleans. Then sometime around June, I realized little black dots were scooting around the pond!
Pond 3.0 has worked well so far. It’s definitely my favorite design, and my qualms with it stem from structural choices. For example, the waterfall separating the upper and lower pond leaks water and is less of a “fall” and more of a “seeping pile of rocks.” I’ve also struggled to control algae at times because the pool sits in direct sunlight for much of the day (fortunately, the algae issue seems to have worked itself out, probably due to the ecosystem self-balancing).
I love ponds, and my favorite designs also skew towards more natural states. I enjoy watching plants and animals grow, develop, and interact. That’s probably why I also love creating gardens – it’s not just about growing plants. Gardens, for me, involve creating a natural community. Then, I just step back and observe.
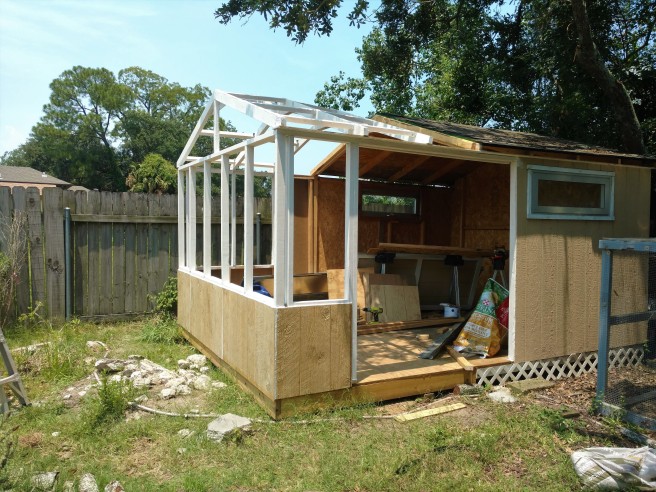
Where we last left off, the skeleton of the shed extension was more or less entirely in place, from floor to roof. So let’s jump right in:
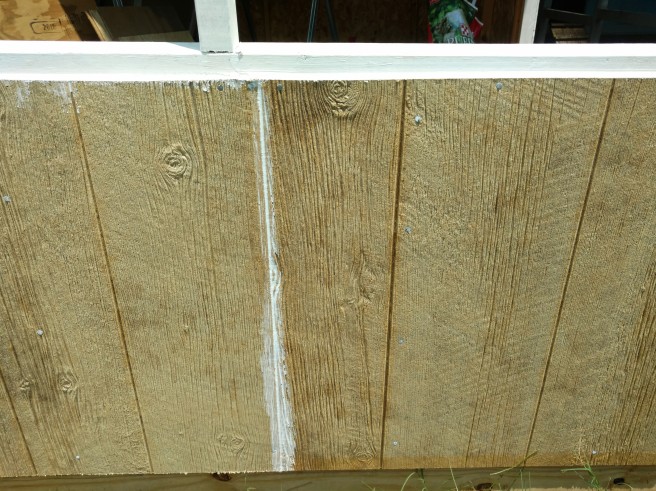
I ordered the siding in a big bulk purchase with the longer (i.e. 12-ft) lengths of lumber, the roofing, etc – all the stuff that was too large or unwieldy for my car. Therefore, I picked the siding out from descriptions on the website. I thought I was buying textured plywood that matched the existing structure. I did not read closely enough. What I actually bought was a “Brown Engineered Siding Panel.” (no wonder it was surprisingly cheap…)
These engineered panels seem pretty tough and they have good reviews. However, I was really worried when I first touched them – they almost feel like tough cardboard or fiber board. I’ve witnessed the latter practically dissolve when hit by water.
Although it’s normally a good idea to seal wood projects soon, I was careful to immediately work on these panels to protect them. First, I caulked all the seams and nail holes/heads.
Then everything got a nice coat of Kilz, inside and out (since I didn’t have the roof on yet). I’m happy to say that the panels seem to be holding up really well so far.
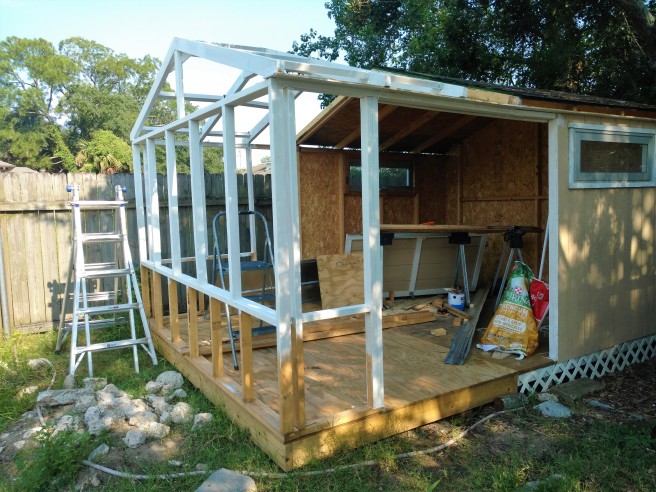
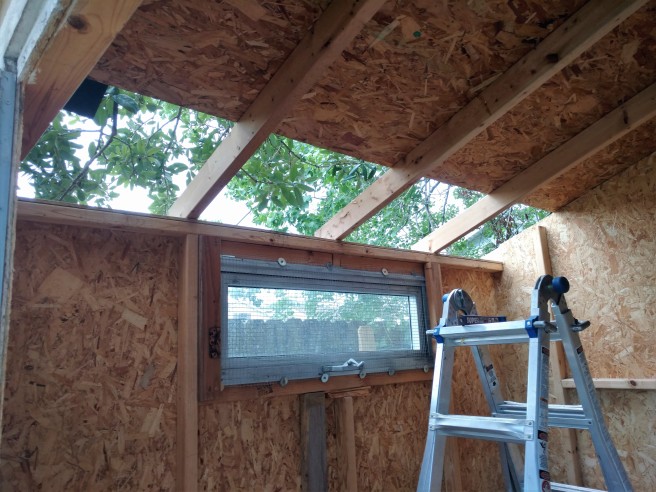
This stage is finally when everything started moving a little bit more quickly, not in the least because I was excited about the polycarbonate panels.
I chose these specialized panels (ordered from Greenhouse Megastore) because they advertise “high impact resistance, excellent heat retention and 80% light transmission.” My other option was the standard polycarbonate ridged panel found at most big box stores. I opted against those, however, because the ones I’ve used on chicken coops tend to get brittle after a year or two under the subtropical sun. I’m hoping these hold up better.
As you can see in the photo above, installing them is more complicated than nailing siding to studs, but not by that much. Seal the top edge with foil tape (the silver roll) and the bottom edge with dust tape (the white roll) to keep out dirt and insects. Then plastic caps go on the top and bottom – but before the bottom cap goes on, drill a few tiny holes in it for condensation to drip out.
Panels like these will tell you which side needs to face out (otherwise the protective qualities won’t work) – they’ll have different colored film on either side. On these, the blue side faces the outside world.
Finally, secure the panels in place with roofing panel screws that have self-sealing neoprene washers to keep the water out of the screw holes. If you’re lazy like me, you might not always stop to pre-drill holes, but it’s especially important to do so here. If you don’t pre-drill, you risk cracking your fancy new panel – ditto if you over-tighten the screw.
Place your screws wisely – the more holes you add, the less insulation your panels provide. These panels seem pretty tough, but they aren’t provided structural support. Therefore, the screws are mostly there to make sure the panels don’t rattle or fly off in high winds.
Bonus chicken butt fluff
Unless you’ve designed your structure to match the panel dimension exactly, you’ll need to cut them at some point. Fortunately, there are blades designed for this delicate task. You’ll want a fine-tooth blade designed for plastics, plexiglass, etc. to reduce the risk of cracking. This one worked fine for me.
Now onto the roof! (shrieking, gnashing of teeth, general terror)
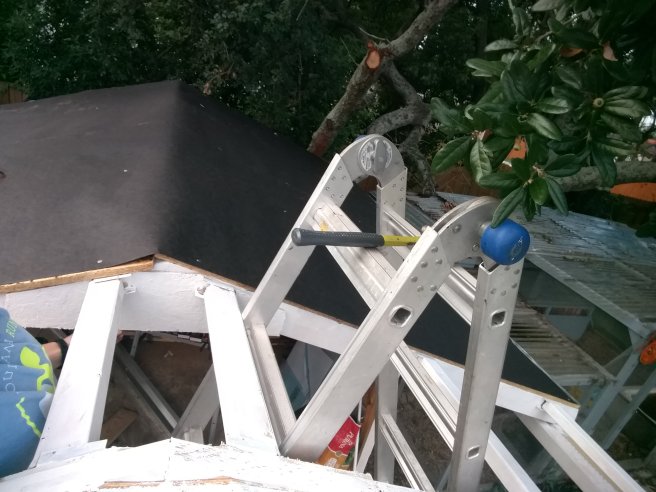
I read up a ton on whether or not it was okay to install metal roofing over shingles. The most frequent opinion I saw was, “Technically it’s fine, but ideally, remove the original roofing.” I tried ripping off the old shingles, but those suckers held on tight. Meanwhile, the sun beat down on my poor little back and sweat made tools slip right out of my hands. If I wanted to finish the project, I needed to give up on removing the shingles and focus on the new install. (I justified this laziness because it’s an outbuilding. I like to think I would’ve completely removed the shingles on a residential roof.)
Step one of covering up my past is a nice layer of tar paper, tacked down with roofing nails.
Although the above photo makes the roof look tiny (instead of stretching back 12 feet), it does a good job showing how awkward it was to maneuver around. My ladder’s sticking up through the rafters. I have the chicken coop on one side, the resin shed around back, and a fence on the third side. Above, a live oak tree was always trying to smack me in the face with branches. For normal shed usage, it’s plenty of space, but for roof work and ladders, it’s irritatingly tight.
On top of the tar paper went metal roofing panels, secured by the same neoprene washer-screws as the polycarbonate panels. I needed about three little plastic boxes of screws for this whole project, and I chose the 2-inch ones to make sure they plunged all the way through the shingles and plywood.
I chose metal roofing panels over more shingles for a few reasons. First, they’re lightweight and easy to manage. Second, I’ve toyed with the idea of adding some gutters onto the shed and collecting water in a rain barrel to use on the garden. I wouldn’t feel as comfortable doing that if shingle dirt was in the water.
Due to the combination of tight spaces, squishy ground underneath ladder legs, and a fear of heights, the most worrisome part of this whole project was adding the roof ridge. I used the same galvanized metal ridge for the whole shed, including over the greenhouse portion.
The roofing panels extend at least a few inches beyond the edge of the shed on all sides. I also replaced some of the drip edge under the new metal roofing. I didn’t install drip edge under the polycarbonate panels because there isn’t a plywood substrate to worry about. I have some extra, though, if water dripping inside becomes an issue (we’ve had several summer storms, though, and the inside of the shed remains dry).
One of the most recent steps involved repainting the whole shed from tan to light green. The color is “Ballroom Dancing” by Valspar, and I love how refreshing and natural it looks, especially with the white trim and the “frosted” effect of the greenhouse panels.
So am I done?
…er, well, mostly. I’d argue that construction/projects and writing share something in common: they’re only ever done when you decide to stop working on them. I’m frequently going back and tweaking existing projects, just as a writer will return to revise a piece over and over.
In terms of this project, there are a few smaller things that need finishing. If you look carefully, you may notice missing fascia (the horizontal facing board) underneath the greenhouse roofing. I’ll need to add that at some point to keep out critters and to help insulate the shed/greenhouse a bit better.
I also need to go back and seal up the areas between polycarbonate panels, the meeting point between the metal and polycarbonate panels, and the gaps between the roof ridge and the panels. For larger spaces, I have sealing spray foam – that stuff is messy, but I love how easily and quickly it fills gaps. Then, for the smaller spaces and perhaps over top of the spray foam, I’ll use clear silicone caulk. Manufacturers of polycarbonate panels will specify which sealants can or cannot be used with their products – make sure you check before buying!
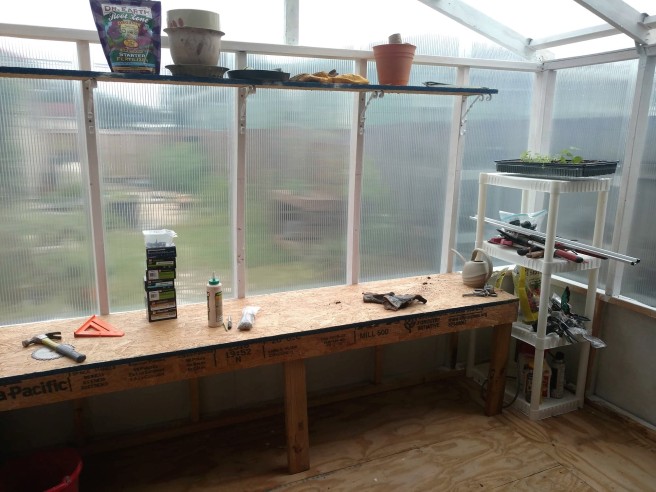
As far as the inside, I’m working on that as I go. The first thing I knew I wanted and needed were some nice shelves for potting and storage. Fortunately, I overbought plywood, so those were relatively easy to whip up and put in place. I also had spare shelf brackets from an earlier house project, which certainly helped.
It’s not perfect, but it’s functional and I love it.
Future ideas for the inside include building more shelves (whoo, storage) and maybe a flip-down workbench in the “shed” part of the shed. I’m also considering adding some plastic sheeting to separate the shed from the greenhouse and concentrate the heat and humidity in the latter portion. However, as it’s still summer and highs are around 90F, I have some time to get there.
Overall, this shed extension/greenhouse addition was a monster of a project. Summer was not the time for this kind of build in south Louisiana, but I’m glad it’s (mostly) done. My “new” shed is extremely spacious. I no longer have to worry about balancing trays of seedlings on scanty window sills inside my house, where one of my cats could easily take a wrong step and flip potting soil onto the floor. I’d say that alone is a win.
I was never a big fan of heights. Growing up, my brother was the one who climbed up on the roof to clean leaves out of gutters. High ropes courses left me jelly-legged and lightheaded (that’s assuming someone was able to persuade me to even scramble up the ladder).
Then in my late teens, I found myself working in a clothing store with one pregnant co-worker and another stricken with vertigo. There was no else to climb up to the tippy top of the ladder and change the light bulbs – except me. I learned to tolerate heights, but I’m still not a great fan. I can climb up on my roof a) if it’s the flat part and b) if I stay at least four feet away from the edge.
As a homeowner working on a budget, sometimes you just have to face your fears and patch roof leaks on your own.
So you can imagine how much I looked forward to installing the roof on the shed extension.
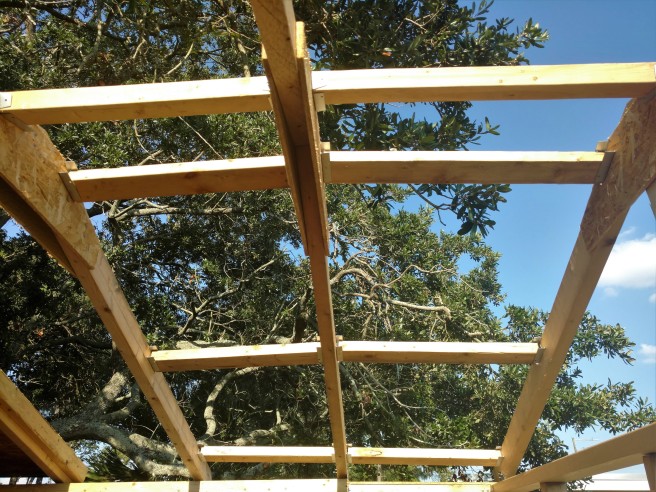
As with the rest of the framing, I wanted to mimic the rafters of the original shed. It was a basic design – a 2×4 on each side with a trapezoid of plywood nailed to the front and the back, stabilizing the whole structure. Then the rafters are then toenailed into the header (the board laid horizontally across the tops of the studs). And if I’m particularly good, they’ll be further secured with hurricane ties to help them stay in place during high wind or pressure changes (thanks, hurricane season in the Gulf!).
I could’ve done a bunch of math and measured angles to determine the cuts, but truth be told, I have a history of messing that kind of thing up. The faster and more accurate route that works for me is to trace the original and make a pattern.
In the above photos, you can see how I made a paper pattern of half of the original trapezoid (it was easier to do half) and then turned that into a full plywood pattern, which I used to draw the rest of the pieces (6 total).
The surface where the 2x4s met was a similar process, although I actually tried to measure to angles and had to make a few practice cuts to get it right. Honestly, guys, geometry was one of my worst subjects in high school, which makes building things really challenging sometimes.
The angles were the hardest part of the rafters. It was easiest to start the toenails with the rafters on the floor of the shed, so that when I lifted them to the headers, I could support the rafter with one hand and hammer with the other.
In the “shed” portion of the, er, shed, the plywood roofing is nailed into the rafters, securing the structure to itself. But for the greenhouse portion (the front 4 feet of the shed), the polycarbonate panels were a bit different. Most sources I found on the internet advised installing boards to stretch between the rafters for the panels to “rest” on. Since I’m a one-woman shop, nailing those boards onto the rafters while they were still on the floor – or even while they were in place – wasn’t going to happen. Fortunately, there’s hardware for that!
I chose supports for fence beams so that I could easily slide the boards right on in. Supportive hardware makes things soooo much easier when you’re working by yourself.
After that, I popped the boards in.
The directions on the polycarbonate panels stated that underlying wood needs to be painted white. Well, they just so happens to jibe with my aesthetic anyway. Truth be told, my white paint is just a few layers of Kilz primer. When I’ve needed to slap some white paint on something outside, I often just end up using Kilz and it tends to hold up pretty well.
I think we’ll call it quits for now. The next post will be dedicated to covering all of the – well – coverings!
Although there was a minor planning/execution screw up at the beginning of the Shed Expansion, the rest of the original shed remained mostly in place.
Before any structure was added onto the shed, the front had to come off. I had vague schemes of re-purposing the lumber and paneling from the front, but I knew the doors definitely needed to be saved and reused on the final building. Therefore, they were the first thing to come off.
Like a happy, screaming mouth.
The door was held on by a pair of long piano hinges that spanned the height of the doorway. There was also a metal strip along the bottom of the doorway to protect the wood. I unfastened a few dozen half-inch screws, which all ended up getting thrown away due to rust. Throughout this project, I’ve tried to save and reuse as much material as possible, but in instances like this, it just wasn’t feasible.
As you’ll see in progress photos a bit, the rest of the front will come down and leave a huge gaping hole. This was not a delicate process. Initially, I tried to delicately pry away the nails with the claw end of my hammer, but that wasn’t doing much. I resorted to whacking the crap out of the panels and 2x3s until they shook loose.
The ladies dancing on the fallen body of the front.
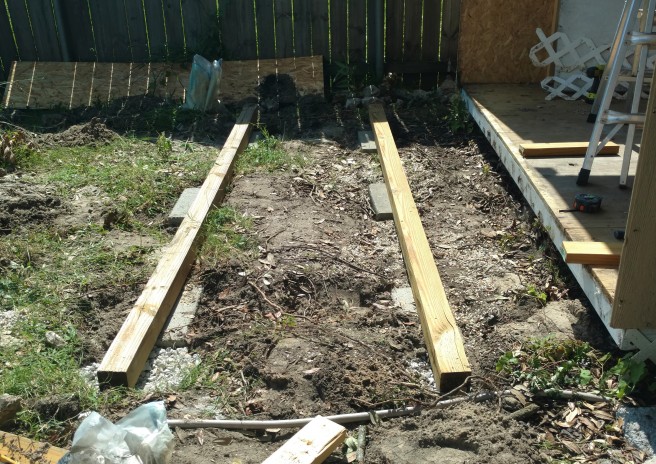
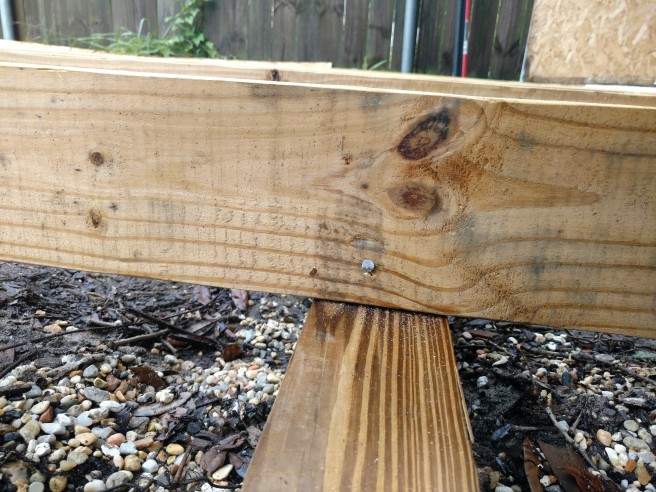
After the existing shed was ready, the next step was to lay the “foundation” for the new addition. The original structure sits on a skid foundation, so I decided to continue that. A skid foundation is basically posts – usually 4x4s – laying across concrete blocks. Then, on top of the posts, you lay your floor frame (aka the subfloor). Skid foundations tend to work best with small- to medium-structures sitting on relatively flat ground.
Because concrete blocks are a pain in the ‘tocks to level, I procrastinated on that part and set about building the frame for my floor. Although the original shed uses 2x4s, most of the guidance I read leaned more towards 2x6s. I probably would’ve been alright with the 2x4s, but better sturdy than sorry.
The spacing between my joists varied from 12 to 20 inches because I was trying to make sure the plywood flooring seams would land on a joist. I secured everything together with 3-inch ring shank decking nails. I normally overbuild and used monstrous screws, so I was worried about the lasting power of nails. However, after having a few go in wonky and being unable to pry them out, I’m convinced the frame is very solid. (particularly when the plywood is secured to the top) Yay!
Then I couldn’t avoid setting the dang blocks. In order for the addition to sit level, I had to account for the extra height of the 2x6s (since the old shed’s floor frame uses 2x4s). I dug and redug holes for the blocks and added or removed buckets of pea gravel until they sat as even as possible. Then the 4x4s went on top, stretching across 10 feet across blocks.
I ended up used about 5bags of pea gravel for the 6 blocks. The new addition will be 6-feet deep, so the poles are evenly spaced to support that. Now here comes the frame!
I should get tiny hardhats for the ladies, since they’re always supervising my work.
With everything in place, I screw the new floor frame onto the original frame. Here, you can also see the front of the shed has been ripped off. I was also slow to put the roof sheet back on that I removed during my false start.
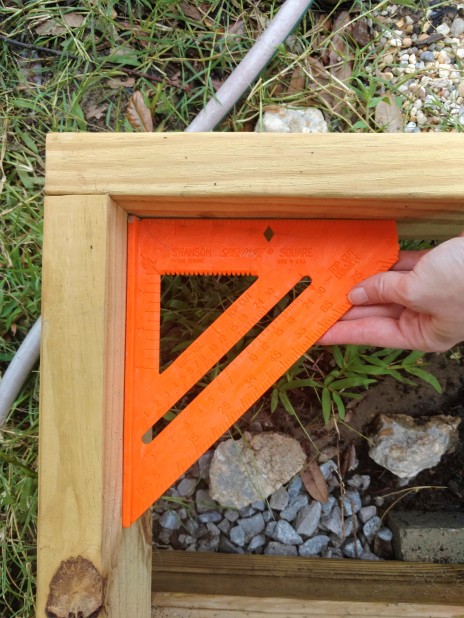
Before the moving on, make sure everything’s nice and square! If not, a few whacks of the hammer should help adjust things.
The frame is secured to the skids through a technique known as “toenailing,” in which you drive a nail a little steeper than 45 degrees into 2 pieces of wood. This project was the first time I tried to toenail anything, so it took some practice to get the technique. It helps to start by driving the nail straight into the wood and then angling it downwards.
The last thing I worked on that day was installing the plywood floor.
I was working with 4’x8′ sheets of 3/4″ severe weather plywood. Side note: get someone to help you carry these sheets. I was able to sort of drag them across the yard, but one ended up falling on my leg and gave me a nasty bruise.
Anyways, in my plan, I figured out how to puzzle-piece these together. The first sheet went on whole, then I laid the next sheet right beside it, put a few nails in to hold it down, and cut off the excess. That excess formed the final piece of the floor. I used subfloor adhesive as well as those 3-inch decking nails to hold everything together.
Well, guys and gals, that was it for the day. If I can make a suggestion, don’t take on a huge, labor-intensive, outdoor project like this in June and July in a subtropical climate. I was so happy to have some spotty shade from the old oak tree, but the heat still knocked me on my butt everyday. Take care of yourself.
Ya know, I guess it’s nice to get mistakes over with in the beginning. At that stage, work can be undone – or at the very least – it can be easier to revamp the rest of the plan.
Before the Great Shed Revamp really began – as in, before I started the fun building stage – some prep work was required. Part of this entailed setting up a temporary shed for equipment like my lawnmower that needs protection from the elements. The other big – huge – MASSIVE part involved moving the shed.
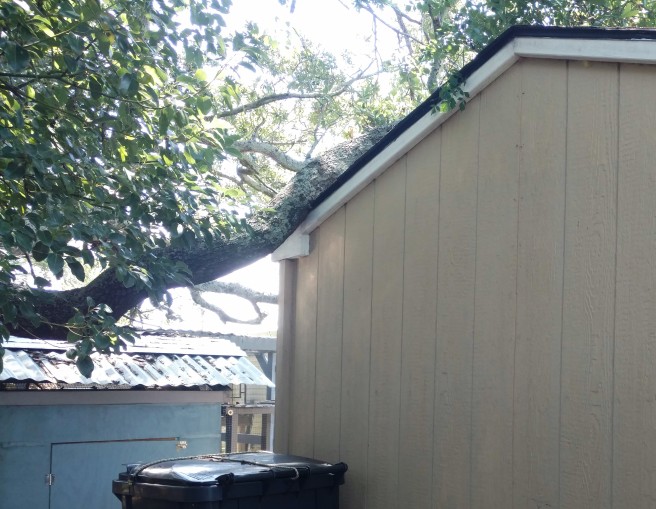
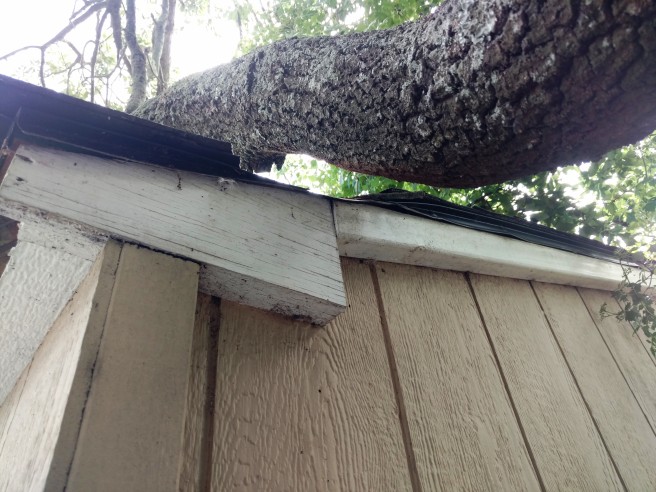
A few years ago, an ex-boyfriend and I used a jack, 2x4s, and poles leftover from a chain link fence to roll my shed back about ten feet. My initial plan involved moving it forward, thanks to an oak branch that had so delightfully decided to prop itself on the back corner of the shed.
Ya jerk!
I was a little worried about the stability of the shed after moving it and then however long the branch was propped up there. Also, just moving a shed is definitely a two-person job (not to mention, I couldn’t jack it up like last time, thanks to Mr. Branchenstein up there). Therefore, I decided to dissemble the shed and rebuild it. Bigger. Faster. STRONGER.
Or at least more stable and scooted forward about four feet.
Step one of disassembly involved removing the roof and OH MY GOODNESS Y’ALL, that was not easy. I mean, it’s great that the roof was on there so securely, since south Louisiana is prone to hurricanes and storms, but not so great when I was trying to pry the plywood away from the rafters. But I finally popped piece free!
Yaaay! Don’t look at the hastily propped up window! Stop looking at it! Stop!
Before I got too much further, I realized I should go ahead and trim some of the smaller branches above the shed so that I didn’t have a future of leaning branches ahead of me, no matter the shed’s location. Previously, on smaller limbs, I’ve tortured myself by using a handsaw. Not this time.
A few years ago, my dad got me a circular saw and a drill from Ryobi’s ONE+ line. They’ve held up well and are my go-to tools. On his advice, I bought several batteries, so I never run out of juice. I was all too happy to see that the ONE+ also had a pole saw, and it was cheaper than most I’d looked at, so yay for that.
Once I got back to my house and set up the pole saw, I…well, I went a little wild. Slicing through all the irritating, half-dead limbs that had bugged me for months was exhilarating. Within half an hour, I’d created a small mountain of detritus.
Destruuuctioooon.
Then an idea occurred to me, and the icy flames of excitement and dread licked my neck.
I walked around to the back of the shed to check out that branch, that core reason for shed disassembly and pain…
Sweet Sally May.
Sure enough, my enthusiasm with the saw removed enough weight for the branch to lift off the shed.
Overall, this is fantastic. I no longer plan on moving the shed (one of the downsides of the move was that the new shed would eat up some of my precious, tiny yard). However, groan, I have to scrabble all around the roof and nail it back down.
At some point, I will probably tackle the rest of the branch and trim it back down to the main trunk, but oh man, do I wish the idea of the trimming the tree would’ve occurred to me earlier. Oh well. Better now than after I’ve taken the whole shed apart.
I still plan to reinforce the inside of the existing shed, just in case there is hidden structural damage. I’m also replacing the roofing. My plans have changed slightly (more on that coming soon), and shingles aren’t really viable for my long-term plans. Also, I hate shingles. I used them on my first chicken coop – never again.
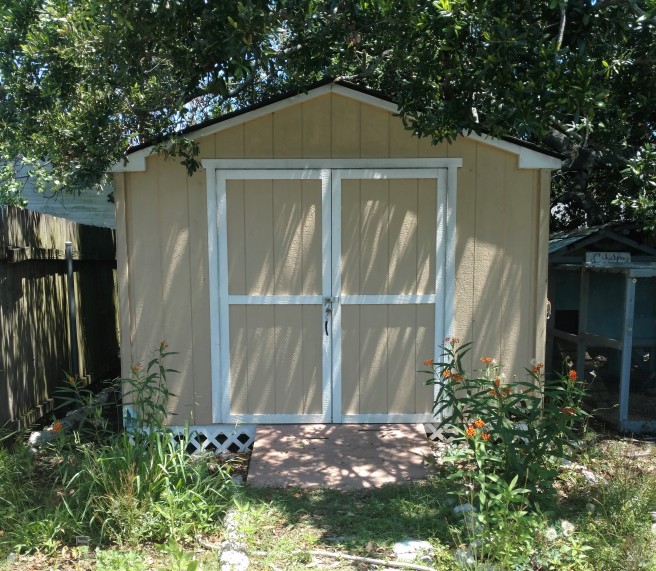
Coming off of the giant project that reformed my front yard, I thought to myself, “I can’t stand not being worn out everyday! I need to sweat until my eyeballs slide out!” Enter: Shed Expansion.
There’s nothing inherently wrong with my little 10’x10′ shed. It’s perfectly find for storing a small amount of lawn equipment, tools, and old paint. But I’d really love a workspace. And, if at all possible, a little greenhouse would be nice too.
Peekaboo, I see you hiding back in those branches.
My backyard isn’t huge, so I can’t go too wild. I’m planning on lengthening the shed by a moderate 6 feet for a final footprint of 10’x16′.
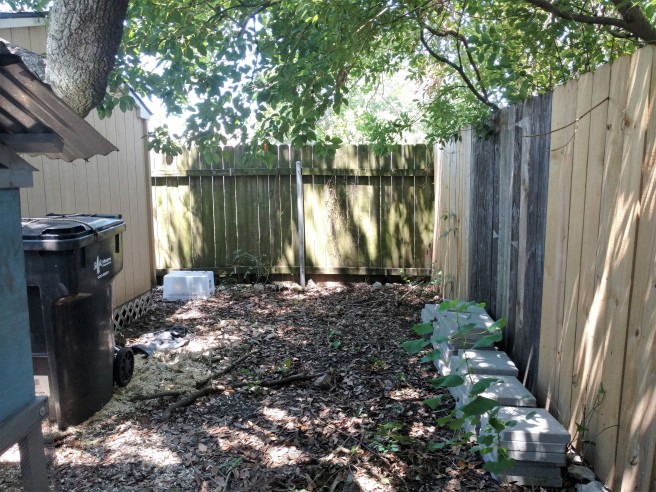
There are some issues to take care before I go construction-crazy, though. First of all, some equipment like my lawn mower really can’t afford to sit outside in summer thunderstorms, so I installed a little resin shed behind the existing shed.
Sad, empty, wasted space!Building a level surface out of pea gravel and pavers.Happy little resin shed (with bonus chicken)!
After everything moves back into the main shed, I plan on keeping my chicken and duck supplies in the resin shed. Currently, the wood shavings, feed, etc. live in that trash can to the left of the resin shed. YUM.
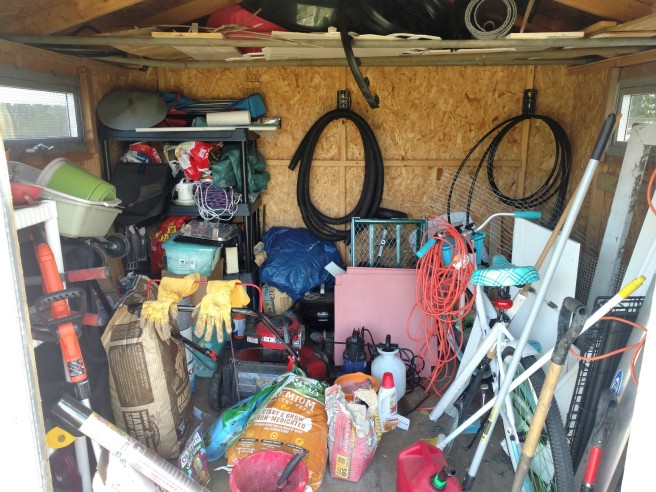
The littlest shed had performed beautifully so far. Do you want to see how much stuff fits inside that lil 5’x6′ box?
Such a shameful mess!
Okay, every single piece of this did not end up in the resin shed. I’m getting rid of the bicycle, and a lot of the wood and tubing will live outside for a bit. But that little resin shed is packed to the gills now.
On the next post, I’ll share how things have gone . . . not so well in the next stages. Until that point, though, I have time to recover those mistakes so I can present something a bit more hopeful and wizened!
You guys, I know it’s more than halfway through June and I haven’t really peeped about my June project goals.
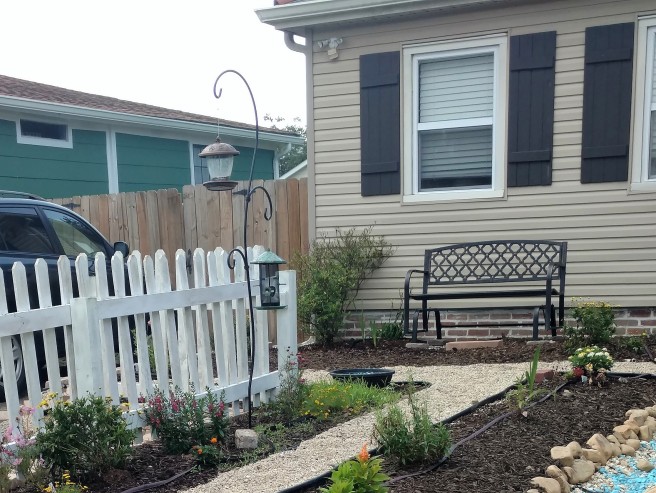
Eh, well, things have not gone quite as Snow White as I was hoping. Fresh off my trip to my parents’ houses, where each has created an avian paradise with feeders and a delightful variety of songbirds, I resolved to add some feeders to my front yard garden and create my own chirpy paradise.
My wise mother advised that the key to a variety of birds was a variety of food, so I added this sweet but sturdy shepherd’s hook and two feeders.
Every few days, I stock one feeder with a songbird blend and the other with pure black oil sunflower seed. I haven’t yet decided what to put on the lowest hook yet, because the birds are like little piggies on the existing feeders. They fling food everywhere. That stuff that looks like grass in front of the bird bath? Sprouted birdseed. Lovely. Fortunately, it’s super easy to pull. I only fill the feeders once or twice a week, which forces the birds to dig around on the ground for scraps and (hopefully) minimize what’s left behind to sprout.
My mom’s significant other always sings the praises of suet. I always reckoned suet as a cold-weather food, but apparently you just have to make sure you get the no-melt kind in summer. I got a cheap little suet holder and hung it from a tiny shepherd’s hook below my crepe myrtle. Inside the branches of that tree, I also have a little nesting ball to encourage some birdies to take up residence in my yard.
The blue circle is the suet feeder; the orange is the nesting ball.
Most recently, I’ve also added a little hummingbird feeder to my kitchen window. I’ve never successfully attracted hummingbirds, though apparently they’re prolific in my area. I’m also terrible at remember to switch out the nectar, which may be the problem.
For a while, I also has numerous crow visitors, but they seem to be taking a break.
Briefly, I thought I saw a chickadee or two. I love chickadees because they tend to look chubby and cheerful. A few grackles have also visited. I’ve also seen several brown birds with red heads. The internet suggests these are house finches, but elsewhere, it doesn’t look like those little guys are supposed to be in my region this time of year.
But I really wanted some variety – some robins and bluebirds and goldfinches. Some color.
Ask and ye shall receive.
Pigeons.
Last weekend, the pigeons found my feeders. Oh boy, did they find them. They told all their pigeon friends and they had a pigeon party at Chez Robyn.
Ugh.
But maybe word will eventually get around to the other songbirds and I’ll see a bit more variety in breeds. I might eventually add a peanut feeder and see if that attracts anyone else. On the plus side, unlike my mom, I don’t have to battle a horde of squirrels. I really just have one stubborn little monster who digs up my bulbs. I think the armies of birds around my feeders intimidate the squirrel, as I haven’t really seen it go for the feeder. So yay for the small victories!
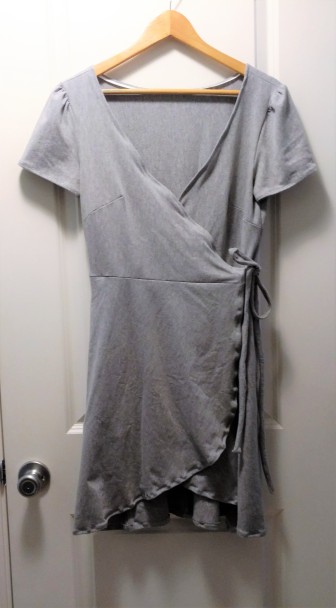
It was easy to sew, as advertised. However, I’m not super happy with the sizing. Typically, you’ll want to make a muslin (mock-up) of a garment before using your final fabric, but that’s tough to do with a stretchy knit (old sheets work great for non-stretchy clothes, though). Plus, I figured a stretch knit would be more forgiving of mistakes. In terms of the Butterick size chart, I should be close to a 14. Looking at the pattern lines, that seemed a bit large, so I cut between the lines for a 10 and a 12.
Y’all, that size chart is way off.
I should’ve made an 8. The shoulders are falling off. Fortunately, I’ve played around with some tucks here and there, and it should be easy to sew in some neat little folds that will both add visual interest and help keep my chest from being fully exposed.
Last weekend held a second sewing project (whooaaaa), this one on a whim. I buy quite of bit of fruit and veggies, and I hate the plastic bags the grocery store has. I found some netting, cord, and toggles in my craft stash and whipped up some reusable produce bags.
Unlike the dress, there is no sizing issue with these. I’ve also moved them into my car, since I tend to stop by the grocery on my way home from work. The sides are sewn with French seams for durability, and the tops are folded down approximately 1 inch and secured with a zigzag stitch as the mesh has a little bit of stretch. They aren’t perfect, but they should work beautifully.
Now onto another domestic art: cooking!
I kept reading about how gaga people were over Instant Pots, so back in January, I ordered . . . not one of those. I actually ended up going for the Crockpot version because it was cheaper and everything I’ve owned by Crockpot has held up well. Anyway, I definitely understand why people love these things. They make amazing rice. I regularly use mine to cook around six pounds of chicken thighs to shred and freeze for lunches and dinners.
They also turn dried beans into cooked deliciousness in 22 minutes!
Bonus: McCoy creeping across the background.
For these, I cooked 1 lb of dried black beans and 1 lb of dried kidney beans in chicken broth. I don’t know exactly how many cups of broth because I just stopped at the “Max Fill” line on the pot. Add some diced onions, set the timer, and voila! Beans for weeks. They freeze well, and they’re good.